Chapitre 2. KDE Quick Start
Table des matières
- 2.1. Démarrage rapide
- 2.2. Starting Programs
- 2.3. Handling Media
- 2.4. Customizing Your Desktop
- 2.5. Applying Desktop Effects
- 2.6. Using Virtual Desktops
- 2.7. Managing Files and Folders
- 2.8. Browsing the Internet
- 2.9. Managing Passwords
- 2.10. E-Mailing and Calendaring
- 2.11. Instant Messaging with Kopete
- 2.12. Starting LibreOffice
- 2.13. Viewing PDF Files and Other Documents
- 2.14. Searching for Data
- 2.15. Creating a CD or DVD
- 2.16. Managing Your Digital Image Collection
- 2.17. Managing Your Music Collection
- 2.18. Déconnexion
- 2.19. For More Information
Résumé
openSUSE® fournit les outils dont les utilisateurs Linux* ont besoin dans leurs activités quotidiennes. Il fournit un environnement graphique simple d'utilisation, le bureau KDE*, qui communique avec le système Linux sous-jacent pour accéder et gérer les fichiers, les dossiers et les programmes. openSUSE fournit une suite intégrée d'applications pour de nombreuses choses (office, multimedia, Internet). La suite LibreOffice est également incluse ce qui vous permet d'éditer et de sauvegarder vos fichiers dans différents formats. Étant donné que la suite bureautique est disponible pour plusieurs systèmes d'exploitation, vous pouvez utiliser les même données à travers différentes plate-formes informatiques.
2.1. Démarrage rapide
Lorsque vous démarrez votre système, un nom d'utilisateur et un mot de passe sont géénralements demandés. Si vous n'avez pas installé le système vous même, demandez avec votre administrateur système le nom d'utilisateur et le mot de passe.
Après vous être connecté à KDE la première fois, vous voyez le bureau KDE qui affiche les éléments de base suivants:
 |
Dossier du bureau: Par défaut, le dossier du bureau affiche le contenu du dossier ~/Desktop. Lorsque vous ajoutez un fichier dans ce dossier, il apparaît également dans cette vue.
Menu contextuel du bureau: Faites un clic droit dans une zone vide du bureau pour accéder au menu contextuel pour configurer l'apparence du bureau, ajouter des panneaux ou des widgets sur le bureau, configurer les paramètres de bureau, verrouiller les widgets à leur position actuelle, quitter la session actuelle ou pour verrouiller l'écran.
Desktop Toolbox: Move your mouse pointer to the icon in the upper right corner of the desktop to access the menu that lets you add or lock widgets.
KDE Panel: By default, the panel of your KDE desktop consists of the icon on the left, further widgets and program icons, and the panel settings icon on the right. If you hover the mouse pointer over an icon in the panel, a short description is displayed.
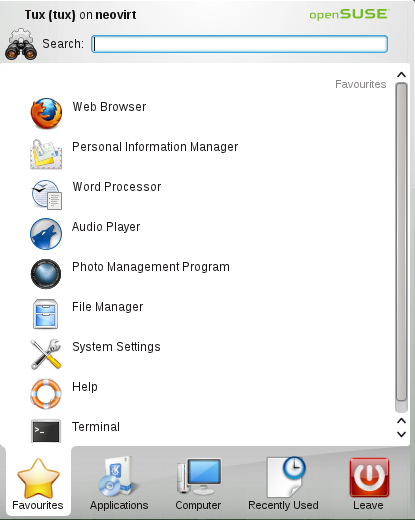
Main Menu. Click on the left side of the bottom panel to open the main menu. The consists of the following elements: a search function at the top and several tabs at the bottom, providing quick access to the key functions of the menu. Additionally, the menu displays your login name and the hostname of your computer.
2.2. Starting Programs
Start programs from the or from the command line, using a shell or the . Additionally, you can start programs from the desktop or the panel by left-clicking the program icon once.
2.2.1. Using the Main Menu
To open the , click the icon in the panel or press Alt+F1.
shows a default selection of key programs for quick access, whereas shows all applications installed on your system. To navigate through the menu structure, click an entry and use the arrow icons at the right or the left to switch back and forth. and provide quick access to some frequently used places, applications, or documents. shows several options for leaving the session such as logging out, locking the screen (access can only be regained with a password), shutting down or restarting the computer. Some computers offer to suspend your session to RAM or disc.
 |
If you often need a program and do not want to dig into the menu structure, you can integrate the icon into the tab. Right-click the icon on any of the other tabs and choose .
2.2.2. Using the Run Command Dialog
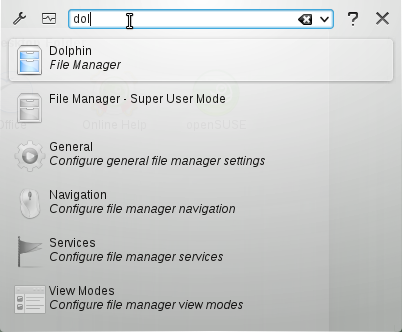
KRunner is a helper application that lets you quickly start programs. Apart from that, it offers a search function for finding applications or locations.
Press Alt+F2 to open the dialog. Type a command, for example, dolphin. While you are typing, the dialog shows a list of applications or actions that match your input. Select one of the results or press Entrée to start the highlighted application or action. The command to start the application is often (but not always) the application name written in lowercase.
 |
The dialog allows you also to use
different features. Click on the question mark icon to see a list of
active features. To configure or get a list of all features, click on
the wrench icon. You can use so-called Web
shortcuts defined in Konqueror to send search requests
directly to a search engine without first opening the browser. Another
interesting feature is to calculate a mathematical expression like
=2+2^4-sin(2). Very useful is to convert units, for
example, from miles per hour into kilometres per hour. Just insert the
expression 60 mph in km/h to get the converted value.
2.2.3. Searching for Programs
Both the and the dialog offer a search function that lets you quickly start programs even if you do not already know the exact application name or command. To search for an application, start typing a command or part of the application name in the field or the input field in the dialog. Each character you enter narrows down the search.
From the list below the input field, choose the application matching your query.
2.3. Handling Media
If you insert a CD or DVD into your drive or plug in a pluggable device (for example, a USB stick or removable hard disk), the device notifier widget opens a small window alerting you to this. It also proposes possible actions, depending on the type of the device.
 |
For example, if you plugged in a digital camera, the actions allow you to download your photos with Gwenview or digiKam. Click the device entry in the widget to access the available actions. To safely remove the device from your computer, use the icon on the right side of the device entry.
2.4. Customizing Your Desktop
You can change the way your KDE desktop looks and behaves to suit your personal preferences.
2.4.1. Locking and Unlocking Desktop Objects
Desktop elements can be locked in their current position to prevent them from being moved around on the desktop. As long as the desktop elements are locked you cannot add, move, or remove any objects to or from your desktop.
To lock or unlock the desktop elements, click the cashew icon (desktop toolbox) at the upper right corner of the desktop and select or .
Alternatively, right-click an empty patch on the desktop and select or .
2.4.2. Changing Individual Desktop Elements
In the following, you can find some examples of how to change individual desktops elements.
Procédure 2.1. Adding Program Icons to the Desktop
To create a link to an application and place it on the desktop or the panel, proceed as follows:
Click the button and browse to the desired application.
Right-click and select from the context menu that appears. If this menu item is not available, your desktop elements are probably locked. Unlock them first as described in Section 2.4.1, « Locking and Unlocking Desktop Objects ».
To change the icon position on the desktop, left-click the icon and drag it to the desired position.
To delete an icon from your desktop, right-click the program icon and select .
Procédure 2.2. Adding Widgets to the Desktop or to the Panel
To add widgets to you desktop, right-click an empty patch on your desktop and select .
To add a widget to the panel, right-click an empty patch on the panel, and select +.
If these menu items are not available, your desktop elements are probably locked. In this case, right-click and select first.
In the list that appears, select a widget. Use the scrollbar to browse through the available widgets. To limit the selection of widgets, either enter a search term in the input field or choose a Category.
To make the selected widget appear on the desktop or in the panel, double-click it and close the dialog box.
To remove a widget from your desktop or panel, right-click the widget and select the entry.
Procédure 2.3. Configuring Desktop Widgets
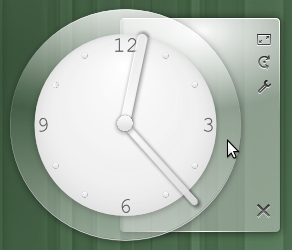
Hover your mouse pointer over the widget until a translucent frame appears around the widget, showing a number of symbols:
If the frame does not appear, your widgets are probably locked. Unlock them first as described in Section 2.4.1, « Locking and Unlocking Desktop Objects ».
To change the widget size, left-click the scale symbol in the frame and keep the mouse button pressed while slowly moving your cursor across the desktop.
To rotate the widget in any direction, left-click the arrow symbol in the frame and keep the mouse button pressed while moving your cursor in a circle across the desktop. There is a sticky boundary in the horizontal and vertical positions where you can « clamp » the widget, if you like. Of course, you can also arrange it in any tilted position.
To change the contents, settings, or properties of a widget, left-click the wrench symbol in the frame. In the configuration dialog box that appears, set the options according to your wishes.
Procédure 2.4. Adding and Removing Panels
If you want multiple panels on the desktop, right-click an empty area on the desktop, select and choose a panel type from the list.
If these menu items are not available, your desktop objects are probably locked. In this case, right-click and select first.
Click the cashew icon at the end of the new panel to access the configuration options and customize the panel as described in Procédure 2.5, « Configuring Panels ».
To delete a panel, right-click a blank space in the panel you want to delete and select +. openSUSE requires that at least one panel is left on the desktop.
Procédure 2.5. Configuring Panels
You can customize all KDE panels according to your preferences. Applications and widgets can be added to the quick launch area or the system tray in the main panel or to additional panels. Panel elements and additional panels can be moved to different places or be completely removed at any time.
To access any options for the current panel, right-click an empty patch in the panel (or click the cashew icon at the end of the panel) and select +. The panel changes view and shows its configurations options.

If the menu item and the icon are not available, your desktop objects are probably locked. To unlock, right-click and select first.
To move panel objects to a different place within the panel, hover the mouse cursor over the respective panel object (for example, program icon, pager, task manager, system tray). The mouse cursor turns into a crosslines-like form. Click the object and move the cursor to the desired position in the panel. Click again to fix it at this place.
To enlarge the distance between two widgets, use . A spacer widget appears on the right side. Drag and drop it to the preferred place.
To change the panel width, click and drag the small arrow icons at the left and right end of the settings panel. Use the arrow on the left side to set the panel's position and the arrows at the right side to set the maximum and minimum size.
To change the panel height, click the button and move the mouse cursor to the desired end location.
To place the panel at different sides of the screen use the button. Drag and drop the panel to the preferred location.
If you need additional widgets on your panel, add them with the button as described in Procédure 2.2, « Adding Widgets to the Desktop or to the Panel ».
To remove program icons or widgets from the panel, right-click the unwanted object and select the menu item to remove the icon or widget.
The icons in the system tray usually belong to applications running in the background. Therefore you can only remove those icons if you close those applications (right-click the icon and select ).
To prevent the panel and widgets from being moved accidentally, use .
For additional configurations options like alignment and functions (like auto hide), click .
If all panel changes are according to your wishes, close the panel settings with the red close button on the right side.
Procédure 2.6. Changing the Desktop Background
You can change the desktop background to display images, a slideshow, patterns or colors. It is even possible to use a map of the globe or the weather report as desktop background.
Right-click an empty patch of the desktop and select . A configuration dialog appears.
In the section, choose a type from the drop-down list. The further configuration options depend on the choice of the object to use as background.
For example, to use an image wallpaper:
Set to .
Define the of the image.
To use one of the available wallpapers, either choose a wallpaper from the list or click to download additional wallpapers.
To use a custom picture, click and select an image file from the file system.
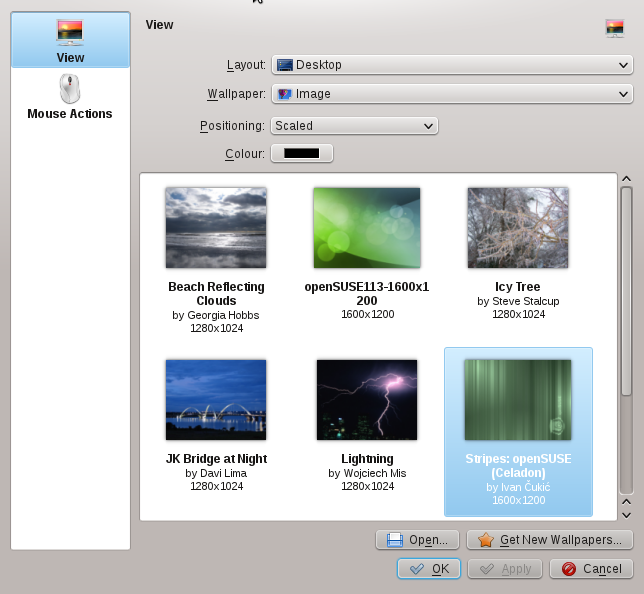
Set the other options in the configuration dialog according to your wishes, and click to save your changes and leave the configuration dialog.
2.4.3. Modifying Personal Settings
Apart from changing individual desktop elements, KDE allows you to personalize your desktop to a very high degree. Possibilities to adjust the overall appearance and behavior of your desktop can be found in the configuration dialog.
Start the from the by selecting +.
The settings are grouped into different categories. Hover over an icon
to see more details. Performing tasks in some areas of the personal
settings requires system administrator (root) permissions.
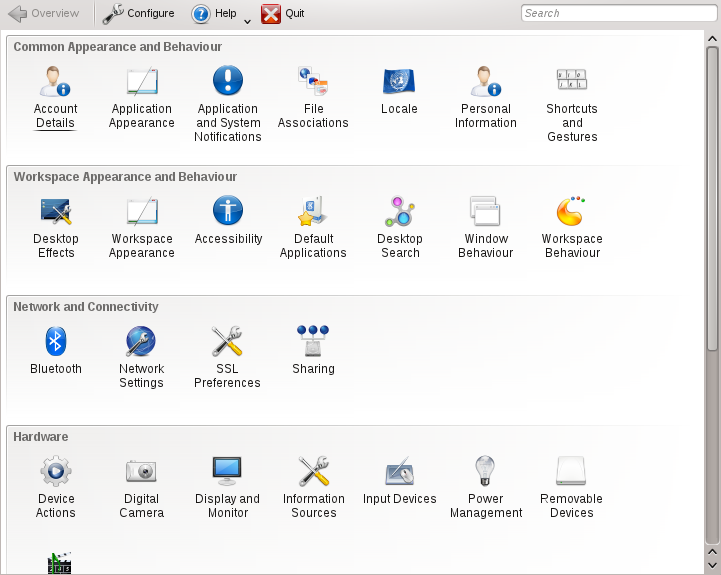 |
Change the settings as desired. No changes take effect until you click . To discard changes in the recent view that you have not yet applied, click . To reset all items in the recent view to the default values, click .
To get back to the start-up view (showing all categories) again, click at the top left corner of the dialog. You can also enter a search string at the top of the window (for example, ) to find the category which holds options related to the search string. Each character you enter in the field further narrows the search.
For easier overview of all categories, you can also switch to a tree view by clicking and selecting another .
2.5. Applying Desktop Effects
If your computer supports a 3D graphics card with Xgl, you can use graphical effects like turning your desktop into a rotating 3D cube, enabling translucent or transparent windows, and zooming in and out of the desktop screen. You can also use other window effects such as shadows, fading, and transformations. If you do not have a 3D graphics card, some effects may be disabled or reduce the performance of your system. If the performance of your system is too low, disable the effects for your current session with Alt+Maj+F12.
To configure effects on your desktop, proceed as follows:
Start the as described in Section 2.4.3, « Modifying Personal Settings ».
Select from the category and choose . If your graphic card does not support 3D, you will be notified.
Optionally, change some options below .
On the tab, select the effects you want to activate. Click the information icon for a short explanation of the respective effect. If an effect is activated, the wrench icon on the right gives access to further configuration options like assigning keyboard shortcuts to the effect.
Use to enable the effects permanently.
2.6. Using Virtual Desktops
The desktop environment allows you to organize your programs and tasks on several virtual desktops. If you often run a lot of programs simultaneously, this minimizes the number of windows to arrange on your screen. You might, for example, use one desktop for e-mailing and calendaring and another for word processing and graphics applications.
Procédure 2.7. Moving an Application to Another Virtual Desktop
You can display a running application on one or all virtual desktops, or move it to other desktops.
Open the application.
Right-click the title bar of the application.
Click .
Select the desktop on which to place the application.
To switch to a certain desktop, click the desired desktop in the pager in the panel. Switch to the next or previous desktop by placing the mouse cursor on an empty patch on the desktop and move the mouse wheel.
Procédure 2.8. Configuring Virtual Desktops
You can increase the number of virtual desktops, change the default names, assign activities, configure effect animations or assign keyboard shortcuts for switching virtual desktops.
To add additional desktops, right-click the pager in the panel and select . A new desktop is shown in the pager.
For any configuration options, right-click the pager and select .
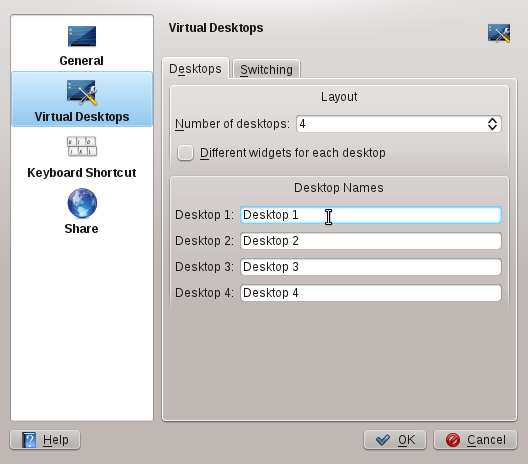
Use the options on the screen to configure the appearance of the pager in the panel.
Desktop names, keyboard shortcuts for switching desktops and the switching type can be configured on the screen.
Set the options according to your wishes and click to apply the changes and to close the configuration dialog.
2.7. Managing Files and Folders
With KDE 4, Dolphin has replaced Konqueror as the default file manager. Konqueror remains a Web browser (refer to Section 2.8, « Browsing the Internet »). Start Dolphin, from the Main Menu by selecting + or press Alt+F2 and enter dolphin.
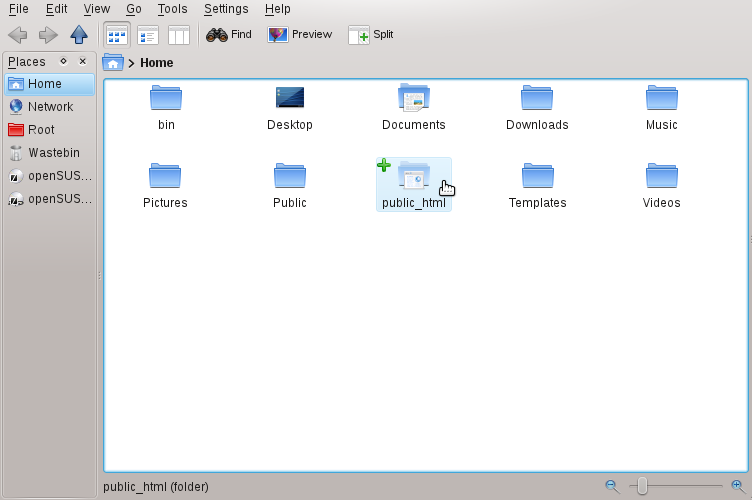
2.7.1. Dolphin Main Window
The Dolphin main window consists of the following elements:
 |
Menu Bar: The menu bar holds menu items for actions like copying, moving, or deleting files, changing views, starting additional tools, defining your settings, and getting help.
Toolbar: The toolbar provides quick access to frequently used functions that can also be accessed via the menu. If you hover the mouse pointer over an icon, a short description is displayed.
Location Bar: The location bar displays the path to the current directory. It is available in two versions: one shows the path to the current directory with icons for every parent folder in a « bread crumb » view. Click any icon in the bread crumb view to change to that directory. The second version of the location bar shows the path to the current directory as a string of text you can edit.
Panels:
By default, Dolphin shows the panel. It
allows quick access to some often-used places like your home directory,
the root directory of the file system (/), the
trash bin, and removable media. There are several other panels you can
add to the main window by clicking +.
Display Field (Working Space): The display field shows the contents of the selected directory or file. By default, Dolphin displays the contents of your home directory on start-up. By default, clicking a folder or file in Dolphin directly starts an action: Dolphin loads the file into an application for further processing or opens the folder.
Status Bar: Shows the file type and size of the currently selected object and allows you to enlarge or diminish the size of the icons or entries shown in the display field.
2.7.2. Managing Files and Folders with Dolphin
To perform actions like copying, moving, creating or deleting files, you need appropriate permissions to the folders and files involved in your action.
To copy, move, or delete a file or folder, proceed as follows:
In order to select one or multiple files and folders in Dolphin, move your mouse pointer over the file or folder but do not click. A green cross appears on the upper-left edge. If you click it, the object is selected. To deselect again, click the red minus icon that appears if the object is currently selected.
Alternatively, press Ctrl and click the objects you want to select or deselect.
Right-click and select or from the context menu.
Navigate to the destination folder in which to insert the object.
To create a new folder at the current location, select ++ or press F10. Enter a folder name in the new window and press Entrée.
To insert the object you copied or cut in Étape 2, right-click the destination folder in the main display field and select . The object is copied or moved there.
To delete a file or folder, right-click the object in the main display field and select from the context menu. The object is moved to the trash bin. From there, you can restore it if necessary or delete the object permanently.
To quickly filter for certain filenames in the current directory, press Ctrl+I to add the input field to the bottom of the Dolphin main window. Type any part of the filename you are searching for to see all files in the current directory containing the search string. For more detailed and advanced searches, press Ctrl+F to use the desktop search. For more information, refer to Section 2.14.2, « Using Strigi Desktop Search ».
2.7.3. Configuring Dolphin
Dolphin offers many options for adjusting the view and the overall settings according to your preferences.
Procédure 2.9. Changing the View
To switch from the bread crumb view to the editable version of the location bar, press F6. Enter a path to a directory by typing it in. After typing an address, press Entrée or click on the background of the bread crumb view.
To delete the contents of the location bar click the black
Xsymbol on the left. To switch back to bread crumb view, press Ctrl+L.
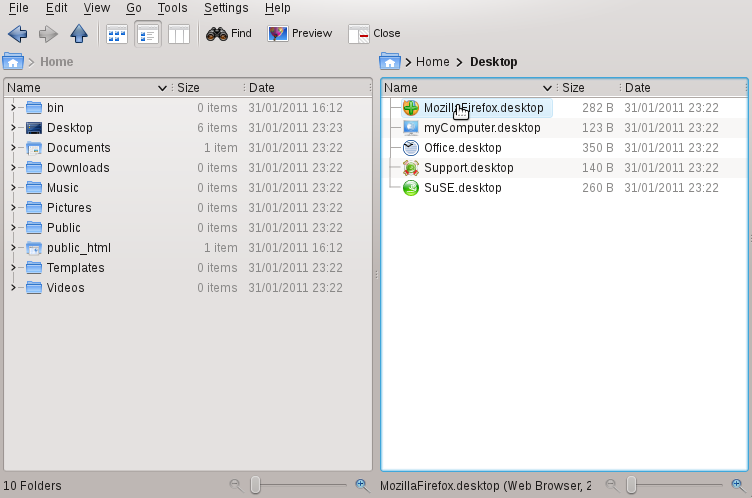
To change the view of the currently displayed folder, either click , , or in the toolbar. Dolphin remembers the selected view for each folder. Click or press F3 to view the contents of the current folder in two separate columns. Now you can navigate to a different directory in each column and easily drag or drop objects or compare the contents of directories. Press F3 again to leave the split view.
To make Dolphin also show hidden files, select +.
To view more details about the files (like access permissions or ownership) in the working space, select + and enable the corresponding options.
To add further directories to the panel, drag a folder from the working space to the panel and drop it there. Right-click and use the context menu to hide, edit or remove entries from .
To add more panels to the main window, select + and select additional panels such as , or .
Detach the panels from the main Dolphin window by clicking the left icon at the top of each panel. Click the panel's title bar and drag it to another place on the desktop. To reintegrate the panel into the Dolphin window, click the left symbol at the top of the panel again.
Procédure 2.10. Changing Dolphin's Overall Behavior
If you want to change Dolphin's overall behavior or view, select + and explore the options offered in the Dolphin configuration dialog.
To use the same view mode for all folders, click in the left sidebar and activate . Click in the left sidebar and adjust the options for the individual view modes. Click to save the changes.
If you want Dolphin to show a different directory on start-up, or if you want to permanently use the editable location bar instead of the bread crumb view, click in the left sidebar and change the relevant options.
To configure which entries and services to show in the Dolphin context menu, click . On the tab, activate the entries to show. Click in the left sidebar and activate or deactivate the respective services to appear in the context menu.
Click to save the changes and to close the Dolphin configuration dialog.
2.8. Browsing the Internet
Apart from Konqueror (KDE's default Web browser), openSUSE also includes the default Firefox Web browser. To start Konqueror or Firefox, press Alt+F2 and enter konqueror or firefox.
With features like tabbed browsing, pop-up window blocking, and download and image management, both browsers combine the latest Web technologies. Their easy access to different search engines helps you find the information you need.
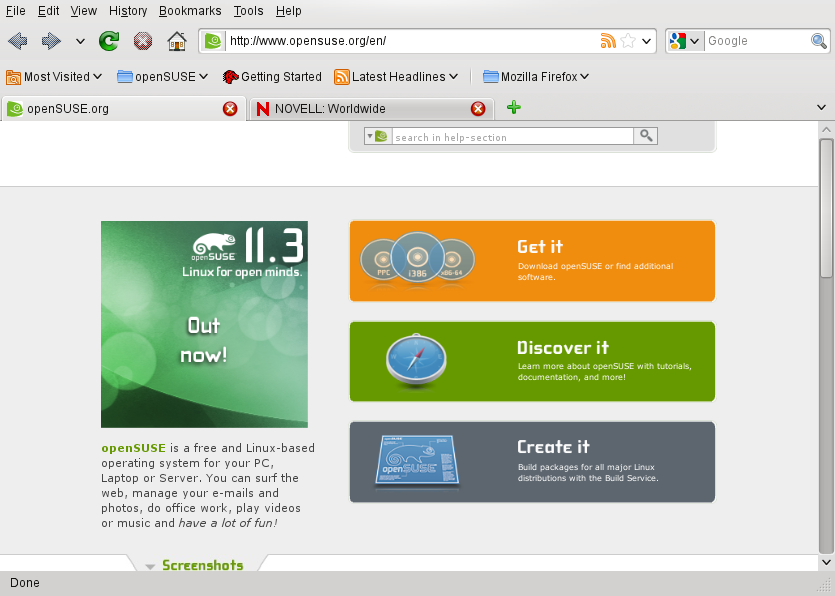 |
Enter a URL in the location bar to start browsing. To open a new, empty tab, press Ctrl+T. To open a link in a new tab, click the link with your middle mouse button. Right-click the tab itself to access more tab options. You can create a new tab, reload one or all existing tabs, or close them. You can also change the sequence of the tabs by dragging and dropping them to the desired position.
2.8.1. Finding Information
Both browsers offer different kinds of search options: you can find information on the Web or you can search the current Web page for keywords.
Procédure 2.11. Searching the Web
To start a search on the Web, click the left icon in the search bar (located next to the location bar) to open a list of search engines.
Select the desired engine and type your search keywords into the input field.
Press Entrée to start the search.
To search the current Web page with Firefox or Konqueror, press Ctrl+F to open a find bar at the bottom of the window. Enter your search keyword there and use the buttons beneath the bar to search in different directions or to configure search options such as .
Konqueror offers predefined Web shortcuts for quickly searching the Web.
For example, to search the Web for yast using the
Google search engine, just type gg: yast into the
Konqueror location bar (or the dialog)
and press Entrée.
You can also define individual Web shortcuts in Konqueror and Firefox as described in Section 2.8.3, « Configuring Preferences ».
2.8.2. Downloading Files from the Web
If you download a file with Firefox or Konqueror, a dialog window appears asking you if you want to save the file or to open it with a specific application. Also choose if to remember the action you selected for this type of file. By default, Firefox saves the file to the folder configured in the and shows your finished downloads in the dialog.
To open the downloaded files directly from there, right-click and select . To clean up the history of downloaded files, click .
2.8.3. Configuring Preferences
Adjust preferences in Konqueror or Firefox. In Konqueror, access the configuration dialog with +. To change the behavior of Konqueror as Web browser, select one of the sub categories in the left sidebar to show the options for the relevant category. For example, you can « hide » Konqueror's real identity and make Konqueror identify as a different browser (for example, Internet Explorer*) for certain Web sites you visit. To do so, select , and click to add a new, site-specific identification.
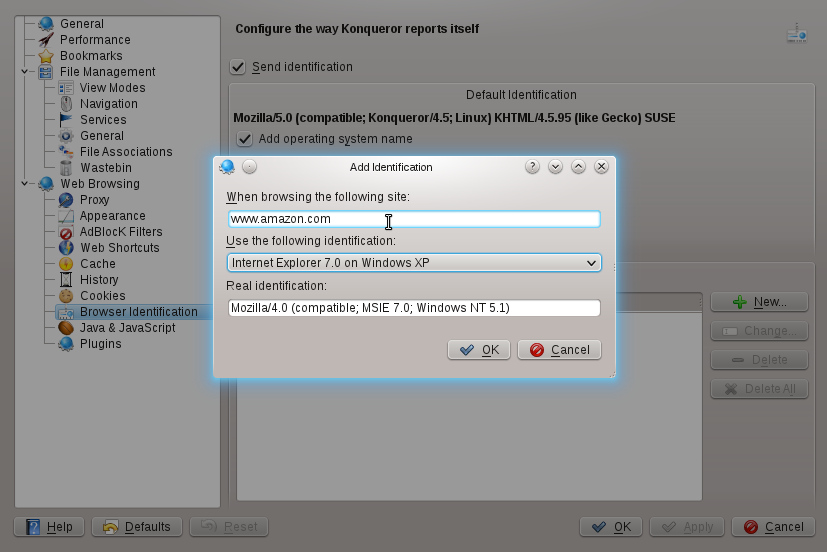 |
You might also want to configure the Web shortcuts you can use with Konqueror (and the dialog). In the Konqueror configuration dialog, click to see which shortcuts are already defined. Click to define new shortcuts. Leave the Konqueror configuration dialog with to apply your changes.
In Firefox, select + to open the . Click the icons in the upper display field to access the options for the relevant category. For example, change the default download folder on the page, or adjust the pop-up blocking feature on the page. Click to apply the changes.
To configure a Web shortcut for a search in Firefox, browse to the Web page with the desired search field. Right-click the search field and choose . Enter a and leave the dialog with .
2.9. Managing Passwords
When you enter a password in a KDE application for the first time (in
KMail or Konqueror, for example), you are asked if you want to store the
password. If you click , KWallet wizard starts by
default. KWallet is a password management tool that can collect all
passwords and store them in one or more encrypted files (called
wallets).
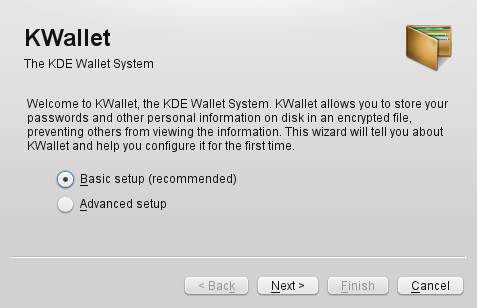 |
To activate KWallet, select and click
. Select and enter a password.
This is your master password for the default wallet (named
kdewallet) that is created during the next step.
![[Warning]](style_images/warning.png) | Protect Your KWallet Password |
|---|---|
If you forget your master password for any wallet, it cannot be recovered. Furthermore, anyone who knows your master password can obtain all information contained in the respective wallet. | |
Click to close the wizard. If you started the KWallet wizard initially from another application like Konqueror or KMail, KWallet will prompt you to enter the password once again in order to store the password for this application in the newly created wallet. After initial configuration you can open your wallet at any time to view, search, delete, or create entries. Normally you do not need to insert an entry manually. KDE recognizes if a resource requires authentication and KWallet starts automatically, prompting you for the KWallet password. However, you can add additional data if you wish. To configure any KWallet options, press Alt+F2 and enter kwalletmanager. In the that opens select +.
Whereas KWallet is designed to centrally manage passwords for several KDE applications, Firefox also offers the ability to store data when you enter a username and a password on a Web site. If you accept by clicking , the password will be stored on your hard disk in an encrypted format. The next time you access this site, Firefox will automatically populate the login fields.
To review or manage your passwords in Firefox, click +++.
2.10. E-Mailing and Calendaring
For reading and managing your mails and appointments, you can use Kontact as your personal information management tool (PIM). Kontact combines KDE applications like KMail, KOrganizer, and KAddressBook into a single interface. This gives you easy access to your e-mails, calendar, address book, and other PIM functionality. Kontact can also manage multiple e-mail accounts.
2.10.1. Starting Kontact for the First Time
To start Kontact, press Alt+F2 and enter kontact. To access one of its components like KMail, click the corresponding icon in the left sidebar.
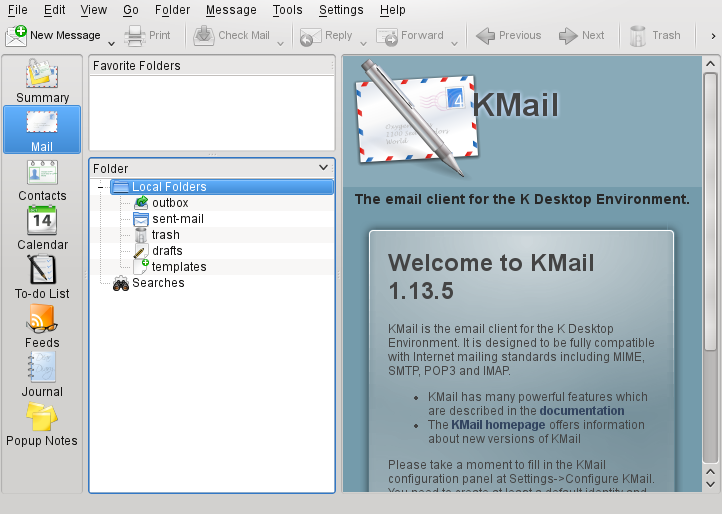 |
Before you can send or receive mails, you must configure an e-mail identity and account:
From the menu, select +.
In the left side pane under , click and select the identity that KMail has automatically created for you. it by entering your full name and e-mail address and confirming your changes.
Click in the left side pane under and at least one account on the tabs for and mails. (Optionally, you can configure multiple mail accounts).
Usually, the following information is required for both incoming and outgoing mail: , and . Depending on the account, you may also need to set encryption or authentication options. If you are not sure about the settings or items to select, consult your Internet Service Provider or system administrator.
Confirm the setup and leave the configuration dialog with .
To write a new mail, click the icon in the Kontact main window and press Ctrl+N to open the mail composer. After you have finished your mail, click to send it immediately. In case you have configured multiple e-mail accounts, keep the button pressed, then select the account from which you want to send the mail.
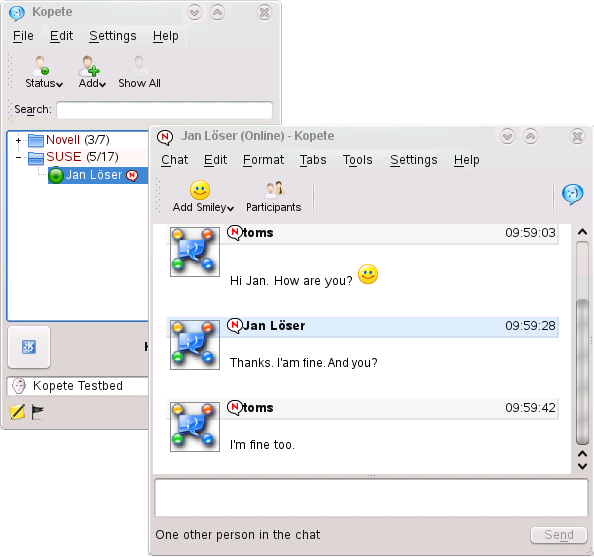
2.11. Instant Messaging with Kopete
Kopete is an online messenger application that allows multiple partners connected to the Internet to chat with each other. Kopete currently supports a number of common messenger protocols, such as AOL* Instant Messenger (AIM), Gadu-Gadu, GroupWise® Messenger, ICQ, Jabber*, SMS, and Yahoo!*. To be able to use instant messaging (IM), you must register with a provider offering IM services and configure a Kopete account.
To start Kopete, press Alt+F2 and enter kopete. If started for the first time, click the wrench icon at the bottom of the Kopete window to create an account. Kopete guides you through the setup steps like selecting the messaging service, and entering the respective account information like user name or ID, server name and port and any authentication details like passwords. If you have not registered with the provider for the selected messaging service yet, click . In the browser window that opens, enter your user data to register. Switch back to Kopete and enter the data received on registration. Complete the configuration of your account by clicking .
If you decided to go online after configuring your account, you can now
add contacts in the main Kopete window. If the Kopete window shows
offline , first click ++ and enter your password if you
are prompted for it. After connecting, click + and
select the Kopete account for which you want to add contacts. Enter the
contact data or search for a contact and click .
To view all your contacts, even if they are offline at the moment, select +.
To start a chat with someone, click the desired contact and type your message in the lower part of the chat window. Press Entrée to send the message. The upper part of the window displays the messages you have sent and received.
 |
2.12. Starting LibreOffice
The office suite LibreOffice offers a complete set of office tools, including word processor, spreadsheet, presentation, vector drawing, and database components. Because LibreOffice is available for a number of operating systems, you can use the same data across different computing platforms.
To start LibreOffice press Alt+F2 and enter libreoffice. To create a new document, select + and choose the type of document to create. To open an existing document, select and choose the appropriate file from the file system.
Find more information in the LibreOffice Quick Start.
2.13. Viewing PDF Files and Other Documents
Documents that need to be shared or printed across multiple platforms can be saved as PDF (Portable Document Format) files, for example, in the LibreOffice suite. View them with Okular, the default KDE document viewer.
2.13.1. Using Okular Document Viewer
Apart from PDF files, Okular allows you to view a great number of file formats, such as PostScript, several image formats, OpenDocument format (ODF), OpenDocument text (ODT), some eBook formats (ePub), and even Microsoft* Compiled HTML Help (CHM). Okular also provides support for bookmarks, annotations, form fields and multimedia content, and the rotation of pages.
Start Okular from the or press Alt+F2 and enter okular.
To open a document, select + and choose the desired file from the file system. Navigate through the document by using the navigation icons at the top or bottom of the window. Depending on which icon you click on the navigation panel on the left, the sidebar either shows a table of , a view of each page, the , or your for this file. To filter for any text listed in the sidebar or the overall document, enter a string into the input field at the top of the sidebar. If you want to select and copy text or images from the file in Okular, click the icon in the toolbar and select one of the options from the context menu. Click the icon to switch back to browsing the document.
Procédure 2.12. Working with Bookmarks and Annotations
With Okular, you can review a document by highlighting certain text parts or adding annotations or bookmarks that Okular then attaches to the file in the form of metadata. Note that the annotations and markers you add are not stored within the document, so you cannot print them or pass them on to other users.
To add a bookmark for a page, click the page in the sidebar or in the main display field and press Ctrl+B. The page is added to the list on the left sidebar. Right-click the bookmark entry to access a context menu for going to this bookmark or renaming, or removing it.
To create an annotation for a page, press F6 and select one of the annotation tools from the toolbar that appears. The annotation is added to the list of and is flagged with the login name of the user who created it. Use the icons at the bottom of the sidebar to group the annotations by page, by author or to show the annotations for the current page only.
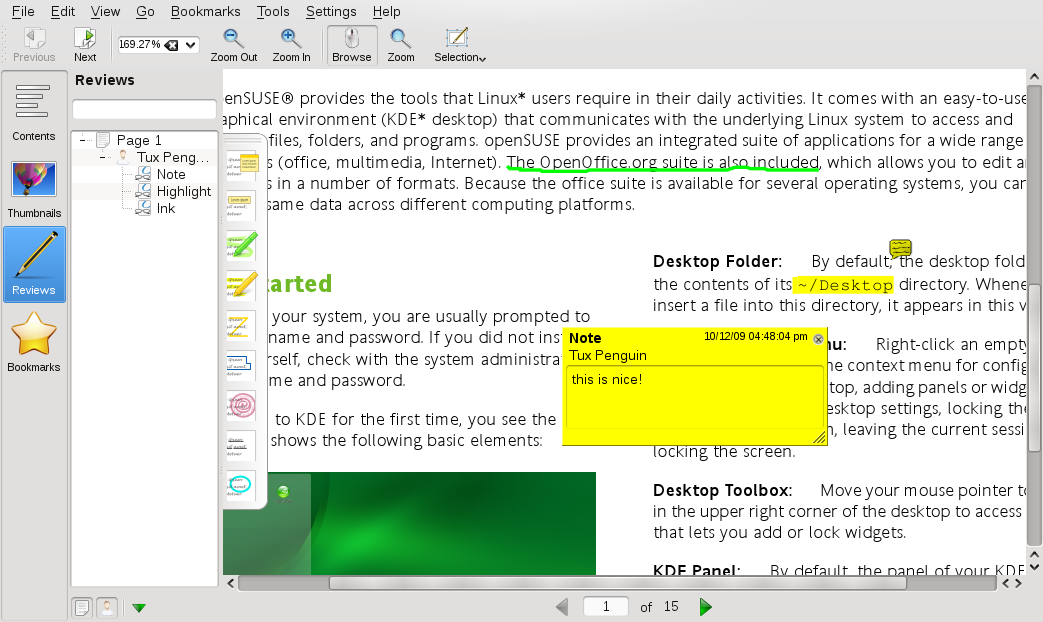
To open a pop-up note and add text for an annotation (or to remove an annotation), right-click the annotation entry in the list and select the corresponding menu item. The annotations or markers you added are automatically attached to the file, you do not need to save them.
2.13.2. Using Acrobat Reader
If Acrobat Reader is not installed by default, install the
acroread package with YaST. To start Acrobat
reader, press Alt+F2 and enter acroread. Click +, locate
the desired PDF file and click to view the file.
2.14. Searching for Data
KDE provides more than one application for finding data on your computer or in the file system. One application is KFind, which is described below.
2.14.1. Using KFind
To perform basic and advanced searches, use KFind. Start it from the by clicking + or press Alt+F2 and enter kfind.
Procédure 2.13. Searching by Name
To use a filename (or a part of it) as the search keyword, proceed as follows:
Enter the filename or a part of the filename in the input field. Use wild cards, such as an asterisk (
*), to indicate missing characters in the filename.Specify the folder in which to search for the file. Either enter a path to the folder in or click to locate the folder.
To search subfolders, check .
Click to start the search. The results are displayed in the lower part of the dialog. To directly open the result, just click it. Right-click it to choose one of the options from the context menu.
Procédure 2.14. Searching by Contents or Properties
For a more detailed search, you can also specify further options, such as a text the file must contain or the creation or modification date of a file. To search for content or properties, proceed as follows:
On the tab, specify at least the path to search for the file. You can leave empty.
To search for certain content in a file, click the tab. In , enter the word or phrase the file to find must contain. This option does not work for all types of files.
To search for properties such as creation or modification date of the file, click the tab and choose the options you want.
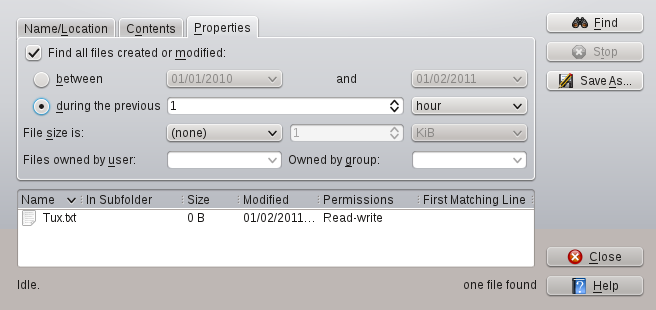
Click to start the search.
2.14.2. Using Strigi Desktop Search
Strigi Desktop Search offers advanced search capabilities by
additionally searching for metadata such as tags, ratings, and even
source URLs for downloads. It requires the services
nepomuk and
strigi to run. To activate
these services, press Alt+F2 and enter strigi.
Choose to start
the configuration dialog. Enable the two services on the tab
and leave the dialog by clicking
and .
Once activated, you can use KRunner (Alt+F2) to search for files by just typing a keyword. A more advanced search interface is available in the Dolphin file manager. Press Ctrl+F in Dolphin to activate the desktop search. You can filter the search results for , or location.
2.15. Creating a CD or DVD
If you possess a CD or DVD writer, you can burn files to a CD or DVD with K3b. To create a data CD or DVD, proceed as follows:
Press Alt+F2 and enter k3b. K3b opens.
Select ++ from the main menu.
Use the tree view in the top left part of the window to search for the files or folders to burn. When they appear in the top right part of the window, drag and drop them into the window.
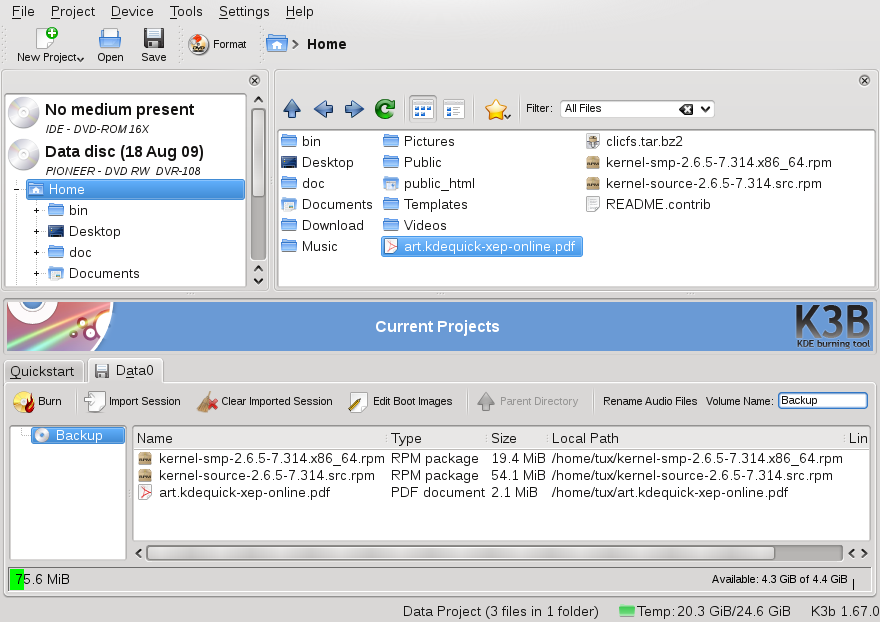
Insert a writable CD or DVD into the device then click the icon.
Check the settings on the tab. Usually the defaults should work well for almost all files. If you wish, you can change more options (for example the ) on the tab.
Click .
2.16. Managing Your Digital Image Collection
With digiKam, it is easy to manage your digital images: download your images from the camera, edit and improve them, organize them in albums (or flag them with tags for easy retrieval, independent of folders or albums), archive them on CD or DVD, or export them to a Web image gallery.
digiKam also contains a set of useful batch functions and plug-ins, allowing you to convert multiple images to various different formats, rename multiple images, or automatically improve them with functions such as red eye reduction, speck removal, and hot pixel removal. Various filter and effects plug-ins help create works of art from your digital images.
To start digiKam, press Alt+F2 and enter digikam. On initial start-up, the first-run wizard appears to guide you through the setup.
 |
digiKam's main window contains a tree view on the left and shows thumbnails of the images on the right. For quick access to your images, use the sidebar on the left, which allows you to switch between different views, for example, sorting the images according to , , or . To enter digiKam's viewing and editing mode, double-click an image thumbnail.
2.17. Managing Your Music Collection
KDE's Amarok music player allows you to play various audio formats, create playlists, listen to streaming audio broadcasts of radio stations on the Internet and subscribe to podcasts. The file types supported depend on the engine used for Amarok.
To start Amarok, press Alt+F2 and enter amarok. On first start, Amarok asks for the folders where to look for your music files.
 |
Amarok's main window shows a sidebar on the left providing different views: your local music collection, some addresses to listen to podcasts or streams from the Internet, your playlists and a file browser. The middle part, the context browser, displays information about the current track, the Wikipedia page of the artist and the song's lyrics by default. The right part of the window shows the current playlist. To play music, just drag and drop items from any of the sidebar browsers to the playlist area. Double-click an item in the playlist to start playback.
If your music files are properly tagged (containing at least information about the artist and album), you can make use of several nice Amarok features. To automatically retrieve the album cover images from Amazon, select + and click . The next time you play a track from this album, the cover is displayed in the context browser and on the on-screen display. To learn more about the artist, click on the button in the middle area to make Amarok search for the appropriate Wikipedia article.
To configure the use of another engine (or various other Amarok features), select +.
2.18. Déconnexion
Log out (and leave the system running), restart or shut down the computer.
2.18.1. Logging Out or Switching Users
Click the button on your panel and select +. This ends your session but leaves the system running. To start a parallel session as a different user, select + instead.
2.18.2. Restarting or Shutting Down the Computer
Click , then select one of the following options:
Only available if your computer provides power management functionality. Pauses your computer without logging you out. All your data and the session data is saved to RAM.
Only available if your computer provides power management functionality. Pauses your computer without logging you out. All your data and the session data is saved to disk before the system is laid to rest. It is thus protected against data loss should you lose power in the meantime.
Redémarre votre ordinateur.
Logs you out of the current session, then turns off the computer.
2.19. For More Information
To learn more about KDE and KDE applications, also refer to http://www.kde.org/ and http://www.kde-apps.org/.