Chapitre 4. Guest Installation
Table des matières
A VM Guest is comprised of an image containing an operating system and data files and a configuration file describing the VM Guest's virtual hardware resources. VM Guests are hosted on and controlled by the VM Host Server.
4.1. Guest Installation with Virtual Machine Manager
Clicking in the Virtual Machine Manager launches vm-install. It provides the graphical that guides you through the guest installation. vm-install can also be run directly from the command-line or from YaST by choosing +.
Start the as described above and click .
Choose whether to install an operation system or an already existing image or disk.
Select the operating system you want to install from the list. Each entry provides reasonable defaults for the chosen operating system.
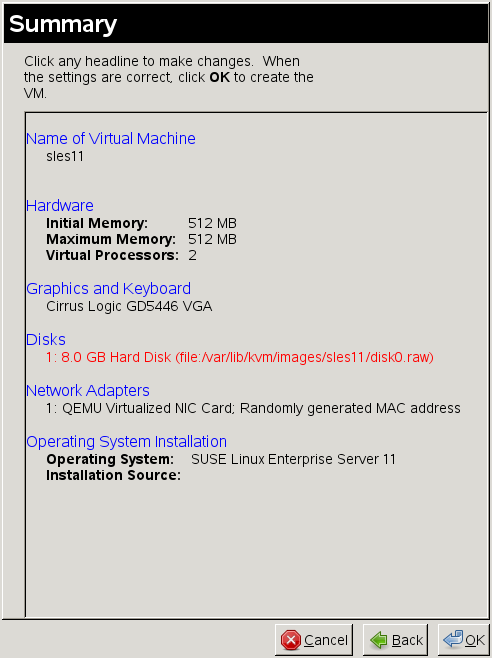
The page shows the default configuration for the chosen operating system. Edit the configuration by clicking on a headline. When having chosen to install a system, you at least have to specify either an image or a CD/DVD device from which to boot or choose PXE boot. When accepting the configuration with , the guest system boots to start the installation.
4.1.1. Customizing the Default Settings
Change the proposed configuration by clicking on a headline in the Summary page of the Create Virtual Machine Wizard:
 |
4.1.1.1. 
Specify a and an optional
for the guest. The
must contain only alphanumeric and
_-.:+ characters. It must be unique among all
VM Guests on the VM Host Server. It is used to create and name the guest’s
configuration file and you will be able to access the guest with this
name from virsh.
4.1.1.2. 
Change memory and CPU assignments in this screen. It is recommended not to specify values larger than the resources the VM Host Server can provide (overcommit), since it may result in errors or performance penalties.
The lets you activate or
deactivate ACPI, APIC, and PAE. It is recommended not to change the
default settings. You can also enable or disable para-virtualized I/O
with virtio or choose to execute the kernel on
boot (linux only) here.
![[Important]](style_images/important.png) | Para-Virtualized I/O |
|---|---|
If you enable para-virtualized I/O by activating
, all hard disks you create will be
configured as | |
4.1.1.3. 
Configure the type of virtualized graphics hardware, the keymap and
sound device in this dialog. If you disable the graphics card support,
the machine is only accessible via network services (ssh) or serial
port. Sound in VM Guests is currently not supported by SUSE,
therefore should be set to
None.
4.1.1.4. 
: Manage virtual hard disks and CD/DVD drives in this dialog. A VM Guest must have at least one virtual disk—either an existing one or a newly created disk. Virtual disks can be:
a single file with a fixed size
a single file that grows on demand (
Sparse Image
       File)
Sufficient Space for Sparse Image Files When creating sparse image files, the partition on which you create them always needs sufficient free space. The VM Guest has no means to check the VM Host Server disk space. Having no space left on the host partition causes write errors and loss of data on the guest system.
a block device, such as an entire disk, partition, or a network volume.
For best performance, create each virtual disk from an entire disk or a partition. For the next best performance, create an image file but do not create it as a sparse image file. A virtual disk based on a sparse image file delivers the most disk space flexibility but slows installation and disk access speeds.
![[Tip]](style_images/tip.png) | Live Migration |
|---|---|
If you need to be able to migrate your VM Guest to another host without shutting it down (live migration), all disks must reside on a network resource (network file system or iSCSI volume) that is accessible from both hosts. | |
By default, a single sparse raw disk image file is created in
/var/lib/kvm/images/
where VM_NAME/VM_NAME is the name of the virtual
machine.
![[Note]](style_images/note.png) | Supported Disk format |
|---|---|
Currently, only the disk formats | |
Procédure 4.1. Creating a Virtual Disk
Click .
Enter a . If creating a file-backed disk, either enter the path directly or click . When creating a disk from a device, enter the device node, for example
/dev/disk/by-path/. It is strongly recommended not to use the simple device paths such aspath/dev/sdbor/dev/sda5, since they may change (by adding a disk or by changing the disk order in the BIOS).Specify the . For creating
rawdisks, choose either for file-backed virtual disks or for device-backed disks.qcow2orqeddisks can be created by choosing the corresponding value.Enter a in GB. This option is only available for file-backed disks.
Choose whether to create a . This option is only available for file-backed disks. If you want to disable write-access to the disk, choose .
If you want to install from DVD or CD-ROM, add the drive to the list of available hard disks. To learn about device nodes of the available optical drives, run:
hwinfo --cdrom | egrep "(Device File:|Model:)"
Instead of the real DVD or CD-ROM drive, you can also add the ISO image of an installation medium. Note that each CD-Rom drive or ISO image can only be used by one guest at the same time.
To add a CD/DVD-ROM device or an ISO image, proceed as follows:
Click .
Enter a . If adding a device, enter its node. If adding an ISO image, either enter the path directly or click to open a file browser.
Specify the . Choose for an ISO image and for a device.
The disks are listed in the order in which they have been created. This order also represents the boot order. Use the and arrows to change the disk order.
4.1.1.5. 
By default, a single virtual network card is created for the virtual
machine. It has a randomly generated MAC address that you can change to
fit your desired configuration. If a bridge exists on the VM Host Server, the
virtual network card will be attached to it, otherwise it will be
attached to the libvirt's
default virtual bridge
(virbr1).
To add a new network adapter or edit an existing one, proceed as follows:
Click to add a card or to change the configuration of the selected card.
Choose a from the drop-down list.
Supported Virtual Network Adapter Types Currently, only , or the paravirtualized (
virtio) are supported by SUSE.Choose a from the drop-down list.
Choose whether to assign a randomly generated MAC address or manually specify an address.
MAC addresses need to be unique When choosing to manually specify a MAC address, make sure it is not already used in your network. If so, it may result in network problems, especially when using DHCP. Therefore avoid specifying obvious MAC addresses such as 52:54:00:12:34:56 or 52:54:00:11:22:33, because they may already be in use. It is strongly recommended to always use a randomly generated MAC address for each adapter.
4.1.1.6. 
This dialog is only available when having chosen to install an operating system. The installation can be booted from a virtual disk, from a CD/DVD device, from an ISO image, a network resource or via PXE boot—use this dialog to configure the boot device.
Also use this dialog to configure the behavior of the VM Guest when the operating system is powered off, rebooted or if it crashes. The following options are available
normal cleanup
a new VM Guest is started in place of the old one
no cleanup, do not delete temporary, configuration and image files
the VM Guest is not cleaned up but is renamed and a new domain started in its place
a crashed machine's core is dumped before a normal cleanup is performed
a crashed machine's core is dumped before a normal restart is performed
4.2. Installing from the Command Line with vm-install
If $DISPLAY is not set (for example, when operating on a
console or on an ssh shell with no X-forwarding),
vm-install offers a command-line wizard to
interactively set up a VM Guest for installation. Once the setup is
completed, the newly created guest boots into the installation system
which can be connected via VNC.
| Graphical User Interface needed for Installation |
|---|---|
Once the VM Guest boots into the installation, you need to connect to the graphical console via VNC to attend the installation. Therefore, you need to start the viewer from a graphical user interface. If you are working from a console with no access to a graphical user interface, you can set up the VM Guest configuration and start the installation at a later time. Refer to Section 4.2.1, « Defining a VM Guest without Starting the Installation » for instructions. | |
To start the wizard, just type vm-install to start. For a lot of parameters, the installation wizard already provides reasonable defaults which you can confirm by just pressing Entrée. Here is a log of an interactive setup for a SUSE Linux Enterprise Server 11 installation:
Exemple 4.1. Interactive Setup on the Command Line Using vm-install
~ # vm-install
Gathering settings...

Please specify the type of operating system that will run within the virtual
machine.  This defines many defaults, and helps decide how to start
paravirtualized operating systems.
Press 'q' or the Escape key to exit.
  1: Novell Open Enterprise Server 2 (Linux)
  2: Novell Open Enterprise Server 2 (NetWare)
  3: Other operating system
  4: PXE
  5: RedHat (other)
  6: RedHat Enterprise Linux 3
  7: RedHat Enterprise Linux 4
  8: RedHat Enterprise Linux 5
  9: SUSE (other)
 10: SUSE Linux Enterprise Desktop 10
 11: SUSE Linux Enterprise Desktop 11
 12: SUSE Linux Enterprise Server 8
 13: SUSE Linux Enterprise Server 9
 14: SUSE Linux Enterprise Server 10
 15: SUSE Linux Enterprise Server 11
 16: Solaris 9 and older
 17: Solaris 10
 18: Windows (other)
 19: Windows (other, x64)
 20: Windows NT
 21: Windows Server 2008
 22: Windows Server 2008 (x64)
 23: Windows Vista, Windows 7
 24: Windows Vista, Windows 7 (x64)
 25: Windows XP, 2000, 2003
 26: Windows XP, 2003 (x64)
 27: openSUSE
 28: openSUSE 11
[15] >

PXE Boot
(Y / N) [N] >
Please choose a name for the virtual machine.
[sles11] >

Description > SLES 11 SP1

Specify the amount of memory and number of processors to allocate for the VM.
Initial Memory [512] >
Maximum Memory [512] > 768
Warning: Setting the maximum memory greater than the initial memory requires
the VM operating system to have a memory balloon driver.
Virtual Processors [2] >

Please specify the type of virtualized graphics hardware.
  1: Cirrus Logic GD5446 VGA
  2: No Graphics Support
  3: VESA VGA
[1] >

Virtual Disks:
  (None)
Do you want to add another virtual disk?
(Y / N) [Y] >

Create a virtual disk based on a device (CD or other block device), an existing
image file (ISO), or a new file.  Specify a device by its device node, such as
/dev/cdrom, not its mount point.
What type of virtual disk do you want to add?
  1: CD-ROM or DVD
  2: Floppy
  3: Hard Disk
[3] > 3
Where will the virtual disk physically reside?
[/var/lib/kvm/images/sles11/hda] >
Size (GB) [4.0] > 8.0
Create a sparse image file for the virtual disk?
(Y / N) [Y] >

Virtual Disks:
  8.0 GB Hard Disk (file:/var/lib/kvm/images/sles11/hda)
Do you want to add another virtual disk?
(Y / N) [N] > y

Create a virtual disk based on a device (CD or other block device), an existing
image file (ISO), or a new file.  Specify a device by its device node, such as
/dev/cdrom, not its mount point.
What type of virtual disk do you want to add?
  1: CD-ROM or DVD
  2: Floppy
  3: Hard Disk
[3] > 1
Where will the virtual disk physically reside?
[/var/lib/kvm/images/sles11/hdb] > /isos/SLES-11-SP1-CD-i386-GM-CD1.iso

Virtual Disks:
  8.0 GB Hard Disk (file:/var/lib/kvm/images/sles11/hda)
  2.9 GB CD-ROM or DVD (file:/isos/SLES-11-SP1-DVD-x86_64-GM-DVD1.iso)
Do you want to add another virtual disk?
(Y / N) [N] >

Network Adapters
  (None)
Do you want to add another virtual network adapter?
(Y / N) [Y] >
What type of virtual network adapter do you want to add?
  1: Fully Virtualized AMD PCnet 32
  2: Fully Virtualized Intel e100
  3: Fully Virtualized Intel e1000
  4: Fully Virtualized NE2000 (ISA Bus)
  5: Fully Virtualized NE2000 (PCI Bus)
  6: Fully Virtualized Realtek 8139
  7: Paravirtualized
[6] > 7

Network Adapters
  Paravirtualized; Randomly generated MAC address
Do you want to add another virtual network adapter?
(Y / N) [N] >

Preparing to start the installation...

Installing...
You may also provide parameters on the command line. The wizard will then prompt you for any missing parameters. In the following all parameters from Exemple 4.1, « Interactive Setup on the Command Line Using vm-install » for which a command line switch exists, are specified. See man 8 vm-install for a full list of parameters.
Exemple 4.2. vm-install command line switches
vm-install --os-type sles11--name "sles11_test"
\ --vcpus 2
--memory 512
--max-memory 768
\ --disk /var/lib/kvm/images/sles11/hda,0,disk,w,8000,sparse=1
\ --disk /iso/SLES-11-SP1-DVD-x86_64-GM-DVD1.iso,1,cdrom
\ --nic mac=52:54:00:05:11:11,model=virtio
\ --graphics cirrus
--config-dir "/etc/libvirt/qemu"

|
Specifies the guest operating system to define suitable defaults. A
list of valid values can be obtained with vm-install
|
| Name of the VM Guest. This name must be unique. |
| Number of virtual processors. |
| Initial amount of memory. |
| Maximum amount of memory. Requires an operating system with a para-virtualized driver. |
|
Defines a virtual hard disk. The file is located at
|
|
Defines an ISO image for a CD-ROM as the second ( |
|
Configures a para-virtualized network device with the MAC address
|
| Specifies the graphics card. |
|
The directory in which the XML configuration file for the virtual
machine will be stored. It is strongly recommended to use the default
directory |
4.2.1. Defining a VM Guest without Starting the Installation
vm-install provides the --no-install
parameter. With this parameter the XML configuration file defining the
VM Guest is created, but the guest is not booted automatically. You may
use it regardless whether you start vm-install in
wizard mode or whether you specify all other options in the command
line. You can start the installation.
![[Warning]](style_images/warning.png) | No Virtual Disk Creation |
|---|---|
When using the | |
Once the VM Guest XML configuration file is successfully created, you need to « register » it so it is recognized by Virtual Machine Manager or virsh. Do so by running:
virsh -c qemu:///system define PATH_TO_XMLFILE4.3. Advanced Guest Installation Scenarios
This section provides instructions for operations exceeding the scope of a normal installation, such as including add-on packages.
4.3.1. Including Add-On Products in the Installation
Some operating systems such as openSUSE and SUSE Linux Enterprise Server offer to include add-on products in the installation process. In case the add-on product installation source is provided via network, no special VM Guest configuration is needed. If it is provided via CD/DVD or ISO image, it is necessary to provide the VM Guest installation system with both, the standard installation images and the image for the add-on product.
First add the standard installation image, and second the physical
CD/DVD-ROM or add-on image. The image or device added first is
automatically chosen as the boot image. In case you install openSUSE or SUSE Linux Enterprise Server, it will be configured as
/dev/sr0, while the add-on product source will be
configured as /dev/sr1.