Chapitre 20. Le serveur HTTP Apache
Table des matières
Avec une part de marché de plus de 50%, le serveur HTTP Apache est le serveur web le plus utilisé dans le monde selon l'enquête de http://www.netcraft.com/. Apache, développé par l'Apache Software Foundation (http://www.apache.org/), est disponible pour la plupart des systèmes d'exploitation. openSUSE® inclut la version 2.2 d'Apache. Dans ce chapitre, apprenez comment installer, configurer et mettre en place un serveur web ; comment utiliser SSL, CGI, et les modules additionnels ; et comment régler les problèmes d'Apache.
20.1. Démarrage rapide
Grâce à cette section, mettez en place et démarrez rapidement Apache. Vous devez être root pour installer et configurer Apache.
20.1.1. Requirements
Assurez-vous que les conditions suivantes sont remplies avec d'essayer de mettre en place le serveur web Apache :
Le réseau de la machine est correctement configuré. Pour plus d'informations à ce sujet, référez-vous à Chapitre 13, Basic Networking.
Le système de temps exact de la machine est maintenu par synchronisation avec un serveur de temps. Cela est nécessaire car des parties du protocole HTTP dépendent de l'heure exacte. Voir Chapitre 17, Time Synchronization with NTP pour en apprendre davantage à ce sujet.
Les dernières mises à jour de sécurité sont installées. En cas de doute, lancez YaST Online Update.
The default Web server port (
80) is opened in the firewall. For this, configure the SuSEFirewall2 to allow the service in the external zone. This can be done using YaST. See section « Configuring the Firewall with YaST » (Chapitre 13, Masquerading and Firewalls, ↑Security Guide) for details.
20.1.2. Installation
Apache n'est pas installé par défaut sur openSUSE. Pour l'installer avec une configuration standard prédéfinie qui fonctionne « out of the box », procédez comme ci-dessous :
Procédure 20.1. Installation d'Apache avec la configuration par défaut
Démarrez YaST et sélectionnez +.
Choisissez + et sélectionnez dans .
Confirmez l'installation des paquets nécessaires pour terminer le processus d'installation.
L'installation comprend le module de multitraitement apache2-prefork ainsi que le module PHP5. Reportez-vous à Section 20.4, « Installation, activation et configuration de modules » pour plus d'informations sur ces modules.
20.1.3. Démarrer
Vous pouvez lancer Apache automatiquement au démarrage ou le lancer manuellement.
Procédure 20.2. Démarrage automatique d'Apache
Pour vous assurer qu'Apache est automatiquement lancé au démarrage en niveaux d'exécution
3et5, exécutez la commande suivante :chkconfig -a apache2
Vous pouvez également démarrer YaST et sélectionner +.
Search for apache2 and the service.
Le serveur web démarre immédiatement.
Enregistrez vos modifications avec .
Le système est configuré pour lancer Apache automatiquement en niveaux d'exécution
3et5au démarrage.
Pour démarrer manuellement Apache avec le terminal, tapez rcapache2 start.
Procédure 20.3. Vérifier si Apache est en cours d'exécution
Si vous ne recevez pas de message d'erreur en lançant Apache, cela signifie généralement que le serveur web fonctionne. Pour tester cela :
Démarrez un navigateur et ouvrez http://localhost/.
Si Apache est installé et fonctionnel, vous obtenez une page de test indiquant « It works! ».
Si vous ne voyez pas cette page, référez-vous à Section 20.8, « Troubleshooting ».
Maintenant que le serveur web fonctionne, vous pouvez ajouter vos propres documents, ajuster la configuration selon vos besoins, ou ajouter des fonctionnalités en installant des modules.
20.2. Configuration d'Apache
openSUSE offre deux options de configuration :
La configuration manuelle offre un haut niveau de détails, mais il lui manque la commodité de l'interface graphique YaST.
![[Important]](static/images/important.png) | Rechargez ou relancez Apache après les modifications de configuration |
|---|---|
La plupart des changements de configuration nécessitent le rechargement d'Apache (parfois également un redémarrage) pour prendre effet. Rechargez manuellement Apache avec rcapache2 Si vous configurez Apache avec YaST, cela peut être pris en charge automatiquement si vous passez à comme décrit dans Section 20.2.3.2, « HTTP Server Configuration ». | |
20.2.1. Fichiers de configuration d'Apache
Cette section donne un aperçu des fichiers de configuration d'Apache. Si vous utilisez YaST pour la configuration, vous n'avez pas besoin de toucher à ces fichiers—cependant, ces informations peuvent vous être utiles si vous souhaitez passer à une configuration manuelle plus tard.
Les fichiers de configuration d'Apache peuvent être trouvés dans deux endroits différents :
20.2.1.1. /etc/sysconfig/apache2
/etc/sysconfig/apache2 contrôle certains paramètres généraux d'Apache, comme les modules à charger, les fichiers de configuration additionnels à inclure, les options avec lesquelles le serveur doit être démarré, et les options qui doivent être ajoutées à la ligne de commande. Chaque option de configuration de ce fichier est abondamment documentée et n'est donc pas mentionnée ici. Pour un serveur web classique, les paramètres de /etc/sysconfig/apache2 devraient être suffisants pour n'importe quel besoin de configuration.
20.2.1.2. /etc/apache2/
/etc/apache2/ accueille tous les fichiers de configuration pour Apache. Dans ce qui suit, l'utilité de chaque fichier est expliquée. Chaque fichier comprend plusieurs options de configuration (également appelées directives). Chaque option de configuration de ces fichiers est largement documentée et n'est donc pas mentionnée ici.
Les fichiers de configuration d'Apache sont organisés comme ceci :
/etc/apache2/
     |
     |- charset.conv
     |- conf.d/
     |   |
     |   |- *.conf
     |
     |- default-server.conf
     |- errors.conf
     |- httpd.conf
     |- listen.conf
     |- magic
     |- mime.types
     |- mod_*.conf
     |- server-tuning.conf
     |- ssl.*
     |- ssl-global.conf
     |- sysconfig.d
     |   |
     |   |- global.conf
     |   |- include.conf
     |   |- loadmodule.conf . .
     |
     |- uid.conf
     |- vhosts.d
     |   |- *.conf
Fichiers de configuration d'Apache dans /etc/apache2/
charset.convSpécifie le jeu de caractères à utiliser pour différentes langues. Ne modifiez pas ce fichier.
conf.d/*.confFichiers de configuration ajoutés par d'autres modules. Ces fichiers de configuration peuvent être inclus dans votre configuration de virtualhost si nécessaire. Voir
vhosts.d/vhost.templatepour des exemples. En procédant ainsi, vous pouvez fournir des ensembles de modules différents pour différents virtualhosts.default-server.confConfiguration globale pour tous les virtualhosts avec des valeurs par défaut raisonnables. Au lieu de changer les valeurs, écrasez-les avec une configuration de virtualhost.
errors.confDéfinit comment Apache répond aux erreurs. Pour personnaliser ces messages pour tous les virtualhosts, éditez ce fichier. Sinon, écrasez ces directives dans vos configurations de virtualhost.
httpd.confLe principal fichier de configuration d'Apache. Évitez de modifier ce fichier. Il contient principalement les instructions include et les paramètres globaux. Écrasez les paramètres globaux dans les fichiers de configuration correspondants listés ici. Changez les paramètres spécifiques à l'hôte (comme la racine des documents) dans la configuration de votre virtualhost.
listen.confLie Apache à des adresses IP et des ports spécifiques. L'hébergement virtuel par nom est également configuré ici. Pour plus de détails, consultez Section 20.2.2.1.1, « Virtualhosts basés sur le nom ».
magicDonnées pour le module mime_magic qui permet à Apache de déterminer automatiquement le type MIME d'un fichier inconnu. Ne modifiez pas ce fichier.
mime.typesTypes MIME reconnus par le système (il s'agit en fait d'un lien vers
/etc/mime.types). Ne modifiez pas ce fichier. Si vous avez besoin d'ajouter des types MIME qui ne figurent pas ici, ajoutez-les dansmod_mime-defaults.conf.mod_*.confFichiers de configuration pour les modules qui sont installés par défaut. Reportez-vous à Section 20.4, « Installation, activation et configuration de modules » pour plus de détails. Notez que les fichiers de configuration pour les modules optionnels se situent dans le répertoire
conf.d.server-tuning.confContient les directives de configuration pour les différents MPMs (voir Section 20.4.4, « Modules multi-processus ») ainsi que les options de configuration générale qui contrôlent les performances d'Apache. Testez correctement votre serveur web lorsque vous faites des changements ici.
ssl-global.confetssl.*Configuration SSL globale et données de certificat SSL. Consultez Section 20.6, « Setting Up a Secure Web Server with SSL » pour plus de détails.
sysconfig.d/*.confFichiers de configuration générés automatiquement à partir de
/etc/sysconfig/apache2. Ne modifiez aucun de ces fichiers—éditez/etc/sysconfig/apache2à la place. Ne mettez pas d'autres fichiers de configuration dans ce répertoire.uid.confSpécifie sous quel utilisateur et quel ID de groupe Apache s'exécute. Ne modifiez pas ce fichier.
vhosts.d/*.confLa configuration de votre virtualhost doit se trouver ici. Le répertoire contient des modèles de fichier pour les virtualhosts avec et sans SSL. Chaque fichier de ce répertoire se terminant par
.confest automatiquement inclus dans la configuration d'Apache. Reportez-vous à Section 20.2.2.1, « Configuration de virtualhost » pour plus de détails.
20.2.2. Configurer Apache manuellement
La configuration manuelle d'Apache nécessite la modification des fichiers textes de configuration en tant qu'utilisateur root.
20.2.2.1. Configuration de virtualhost
Le terme virtualhost fait référence à la capacité d'Apache de servir plusieurs URIs (Universal Resource Identifiers) depuis la même machine physique. Cela signifie que plusieurs domaines, comme www.example.com et www.example.net, sont gérés par un seul serveur web sur une seule machine physique.
Il est courant d'utiliser des virtualhosts pour réduire les tâches d'administration (un seul serveur web doit être maintenu) et les frais de matériel (chaque domaine ne nécessite pas un serveur dédié). Les virtualhosts peuvent être basés sur le nom, l'IP, ou le port.
Pour lister tous les virtualhosts existants, utilisez la commande httpd2 -S. Cela affiche une liste indiquant le serveur par défaut et tous les virtualhosts ainsi que leurs adresses IP et ports d'écoute. En outre, la liste contient aussi une entrée pour chaque virtualhost indiquant son emplacement dans les fichiers de configuration.
Les virtualhosts peuvent être configurés avec YaST comme décrit dans Section 20.2.3.1.4, « Virtual Hosts » ou en éditant manuellement un fichier de configuration. Par défaut, Apache est préparé dans openSUSE pour utiliser un fichier de configuration par virtualhost dans /etc/apache2/vhosts.d/. Tous les fichiers de ce répertoire possédant l'extension .conf sont automatiquement inclus dans la configuration. Un modèle de virtualhost basique est fourni dans ce répertoire (vhost.template ou vhost-ssl.template pour un virtualhost avec le support de SSL).
![[Tip]](static/images/tip.png) | Toujours créer une configuration de virtualhost |
|---|---|
Il est recommandé de toujours créer un fichier de configuration de virtualhost, même si votre serveur web n'héberge qu'un seul domaine. En faisant cela, vous avez non seulement la configuration spécifique au domaine dans un fichier, mais vous pouvez également toujours revenir à une configuration fonctionnelle de base en déplaçant, supprimant ou renommant simplement le fichier de configuration du virtualhost. Pour la même raison, vous devez également créer des fichiers de configuration séparés pour chaque virtualhost. Lors de l'utilisation de virtualhosts basés sur le nom, il est recommandé de mettre en place une configuration par défaut qui sera utilisée quand un nom de domaine ne correspond pas à une configuration de virtualhost. Le virtualhost par défaut est celui dont la configuration est chargée en premier. Étant donné que l'ordre des fichiers de configuration est déterminé par le nom de fichier, débutez le nom du fichier de configuration du virtualhost par défaut avec un caractère underscore ( | |
Le bloc <VirtualHost></VirtualHost> comprend les informations qui s'appliquent à un domain particulier. Quand Apache reçoit la demande d'un client pour un virtualhost défini, il utilise les directives incluses dans cette section. Presque toutes les directives peuvent être utilisées dans le contexte d'un virtualhost. Pour plus d'informations sur les directives de configuration d'Apache, consultez http://httpd.apache.org/docs/2.2/mod/quickreference.html.
20.2.2.1.1. Virtualhosts basés sur le nom
Avec des virtualhosts basés sur le nom, plusieurs sites web peuvent être desservis par adresse IP. Apache utilise le champ d'hôte dans l'en-tête HTTP qui est envoyée par le client pour connecter la requête à une entrée ServerName correspondante dans l'une des déclarations de virtualhost. Si aucun ServerName correspondant n'est trouvé, le premier virtualhost spécifié est utilisé comme valeur par défaut.
La directive NameVirtualHost indique à Apache sur quelle adresse IP, et éventuellement, quel port il doit écouter pour les requêtes de clients contenant le nom de domaine dans l'en-tête HTTP. Cette option est configurée dans le fichier de configuration /etc/apache2/listen.conf.
Le premier argument peut être un nom de domaine pleinement qualifié (FQDN, Fully Qualified Domain Name), mais il est recommandé d'utiliser l'adresse IP. Le second argument est le port, mais il est optionnel. Par défaut, le port 80 est utilisé et configuré via la directive Listen.
Le joker * peut être utilisé aussi bien pour l'adresse IP que pour le numéro de port afin de recevoir les requêtes sur toutes les interfaces. Les adresses IPv6 doivent être définies entre crochets.
Exemple 20.1. Variations of Name-Based VirtualHost Entries
# NameVirtualHostAdresse IP[:Port]NameVirtualHost 192.168.3.100:80 NameVirtualHost 192.168.3.100 NameVirtualHost *:80 NameVirtualHost * NameVirtualHost [2002:c0a8:364::]:80
The opening VirtualHost tag takes the IP
address (or fully qualified domain name) previously declared with the
NameVirtualHost as an argument in a
name-based virtual host configuration. A port number previously
declared with the NameVirtualHost directive
is optional.
Le joker * est aussi autorisé comme substitut pour l'adresse IP. Cette syntaxe n'est valable qu'en association avec l'utilisation du joker dans NameVirtualHost *. Lorsque vous utilisez des adresses IPv6, l'adresse doit figurer entre crochets.
Exemple 20.2. Directives VirtualHost basées sur le nom
<VirtualHost 192.168.3.100:80>
  ...
</VirtualHost>

<VirtualHost 192.168.3.100>
  ...
</VirtualHost>

<VirtualHost *:80>
  ...
</VirtualHost>

<VirtualHost *>
  ...
</VirtualHost>

<VirtualHost [2002:c0a8:364::]>
  ...
</VirtualHost>
20.2.2.1.2. Virtualhosts basés sur l'IP
Cette configuration de virtualhost alternative nécessite la configuration de plusieurs adresses IP pour une machine. Une seule instance d'Apache héberge plusieurs domaines, dont chacun se voit attribuer une IP différente.
Le serveur physique doit avoir une adresse IP pour chaque virtualhost basé sur l'IP. Si la machine ne dispose pas de plusieurs cartes réseau, des interfaces réseau virtuelles (IP aliasing) peuvent également être utilisées.
L'exemple suivant montre Apache fonctionnant sur une machine avec l'IP 192.168.3.100, hébergeant deux domaines sur les IP additionnelles 192.168.3.101 et 192.168.3.102. Un bloc VirtualHost séparé est nécessaire pour chaque serveur virtuel.
Exemple 20.3. Directives VirtualHost basées sur l'IP
<VirtualHost 192.168.3.101>
  ...
</VirtualHost>

<VirtualHost 192.168.3.102>
  ...
</VirtualHost>
Ici, les directives VirtualHost sont spécifiées uniquement pour les interfaces autres que 192.168.3.100. Quand une directive Listen est également configurée pour 192.168.3.100, un hôte virtuel distinct basé sur l'IP doit être créé pour répondre aux requêtes HTTP vers cette interface—dans le cas contraire, les directives trouvées dans la configuration par défaut du serveur (/etc/apache2/default-server.conf) sont appliquées.
20.2.2.1.3. Configuration de virtualhost basique
Au minimum, les directives suivantes doivent être présentes dans chaque configuration de virtualhost afin de mettre en place un virtualhost. Consultez /etc/apache2/vhosts.d/vhost.template pour plus d'informations.
ServerNameThe fully qualified domain name under which the host should be addressed.
DocumentRootPath to the directory from which Apache should serve files for this host. For security reasons, access to the entire file system is forbidden by default, so you must explicitly unlock this directory within a
Directorycontainer.ServerAdminAdresse e-mail de l'administrateur du serveur. Cette adresse apparait, par exemple, sur les pages d'erreur créées par Apache.
ErrorLogThe error log file for this virtual host. Although it is not necessary to create separate error log files for each virtual host, it is common practice to do so, because it makes the debugging of errors much easier.
/var/log/apache2/is the default directory for Apache's log files.CustomLogThe access log file for this virtual host. Although it is not necessary to create separate access log files for each virtual host, it is common practice to do so, because it allows the separate analysis of access statistics for each host.
/var/log/apache2/is the default directory for Apache's log files.
Comme mentionné ci-dessus, l'accès à l'intégralité du système de fichiers est interdit par défaut pour des raisons de sécurité. Par conséquent, déverrouillez explicitement les répertoires dans lesquels vous avez placé les fichiers qu'Apache doit servir—par exemple le DocumentRoot :
<Directory "/srv/www/www.example.com/htdocs">
  Order allow,deny
  Allow from all
</Directory>
Le fichier de configuration complet ressemble à ceci :
Exemple 20.4. Configuration VirtualHost basique
<VirtualHost 192.168.3.100>
  ServerName www.example.com
  DocumentRoot /srv/www/www.example.com/htdocs
  ServerAdmin webmaster@example.com
  ErrorLog /var/log/apache2/www.example.com_log
  CustomLog /var/log/apache2/www.example.com-access_log common
  <Directory "/srv/www/www.example.com/htdocs">
    Order allow,deny
    Allow from all
  </Directory>
</VirtualHost>
20.2.3. Configuring Apache with YaST
To configure your Web server with YaST, start YaST and select +. When starting the module for the first time, the starts, prompting you to make a few basic decisions concerning administration of the server. After having finished the wizard, the dialog starts each time you call the module. For more information, see Section 20.2.3.2, « HTTP Server Configuration ».
20.2.3.1. HTTP Server Wizard
The HTTP Server Wizard consists of five steps. In the last step of the dialog, you are given the opportunity to enter the expert configuration mode to make even more specific settings.
20.2.3.1.1. Network Device Selection
Here, specify the network interfaces and ports Apache uses to listen for
incoming requests. You can select any combination of existing network
interfaces and their respective IP addresses. Ports from all three
ranges (well-known ports, registered ports, and dynamic or private
ports) that are not reserved by other services can be used. The default
setting is to listen on all network interfaces (IP addresses) on port
80.
Check to open the ports in the firewall that the Web server listens on. This is necessary to make the Web server available on the network, which can be a LAN, WAN, or the public Internet. Keeping the port closed is only useful in test situations where no external access to the Web server is necessary. If you have multiple network interfaces, click to specify on which interface(s) the port(s) should be opened.
Click to continue with the configuration.
20.2.3.1.2. Modules
The configuration option allows for the activation or deactivation of the script languages that the Web server should support. For the activation or deactivation of other modules, refer to Section 20.2.3.2.2, « Server Modules ». Click to advance to the next dialog.
20.2.3.1.3. Default Host
This option pertains to the default Web server. As explained in Section 20.2.2.1, « Configuration de virtualhost », Apache can serve multiple virtual hosts from a single physical machine. The first declared virtual host in the configuration file is commonly referred to as the default host. Each virtual host inherits the default host's configuration.
To edit the host settings (also called directives), choose the appropriate entry in the table then click . To add new directives, click . To delete a directive, select it and click .
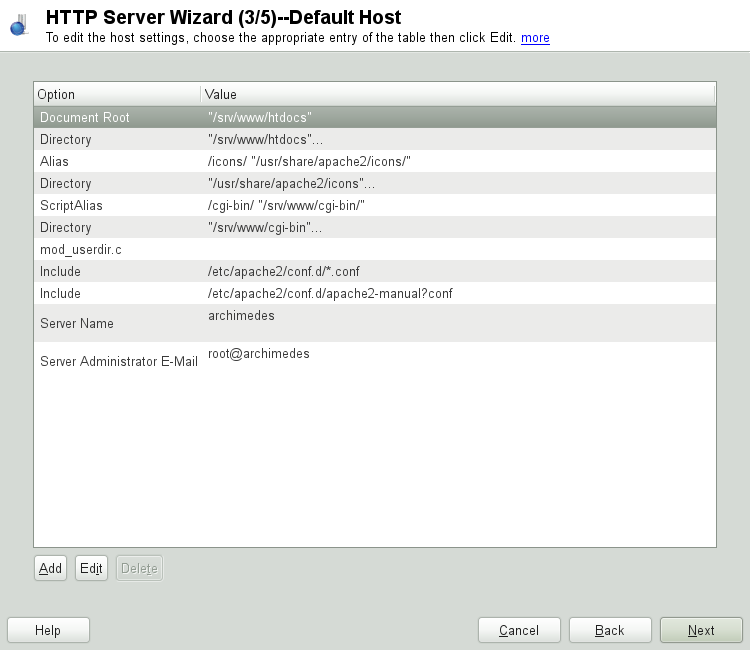
Here is list of the default settings of the server:
Document RootPath to the directory from which Apache serves files for this host.
/srv/www/htdocsis the default location.AliasWith the help of
Aliasdirectives, URLs can be mapped to physical file system locations. This means that a certain path even outside theDocument Rootin the file system can be accessed via a URL aliasing that path.The default openSUSE
Alias/iconspoints to/usr/share/apache2/iconsfor the Apache icons displayed in the directory index view.ScriptAliasSimilar to the
Aliasdirective, theScriptAliasdirective maps a URL to a file system location. The difference is thatScriptAliasdesignates the target directory as a CGI location, meaning that CGI scripts should be executed in that location.DirectoryWith
Directorysettings, you can enclose a group of configuration options that will only apply to the specified directory.Access and display options for the directories
/srv/www/htdocs,/usr/share/apache2/iconsand/srv/www/cgi-binare configured here. It should not be necessary to change the defaults.IncludeWith include, additional configuration files can be specified. Two
Includedirectives are already preconfigured:/etc/apache2/conf.d/is the directory containing the configuration files that come with external modules. With this directive, all files in this directory ending in.confare included. With the second directive,/etc/apache2/conf.d/apache2-manual.conf, theapache2-manualconfiguration file is included.Server NameThis specifies the default URL used by clients to contact the Web server. Use a fully qualified domain name (FQDN) to reach the Web server at
http://or its IP address. You cannot choose an arbitrary name here—the server must be « known » under this name.FQDN/Server Administrator E-MailE-mail address of the server administrator. This address is, for example, shown on error pages Apache creates.
After finishing with the step, click to continue with the configuration.
20.2.3.1.4. Virtual Hosts
In this step, the wizard displays a list of already configured virtual hosts (see Section 20.2.2.1, « Configuration de virtualhost »). If you have not made manual changes prior to starting the YaST HTTP wizard, no virtual host is present.
To add a host, click to open a dialog in which to
enter basic information about the host, such as ,
(DocumentRoot), and the . is used to
determine how a host is identified (name based or IP based). Specify the
name or IP address with
Clicking advances to the second part of the virtual host configuration dialog.
In part two of the virtual host configuration you can specify whether or
not to enable CGI scripts and which directory to use for these scripts.
It is also possible to enable SSL. If you do so, you must specify the
path to the certificate as well. See
Section 20.6.2, « Configuring Apache with SSL » for details on SSL and
certificates. With the option, you
can specify which file to display when the client requests a directory
(by default, index.html). Add one or more filenames
(space-separated) if you want to change this. With , the content of the users public directories
(~) is
made available on the server under
user/public_html/http://www.example.com/~.
user
| Creating Virtual Hosts |
|---|---|
It is not possible to add virtual hosts at will. If using name-based virtual hosts, each hostname must be resolved on the network. If using IP-based virtual hosts, you can assign only one host to each IP address available. | |
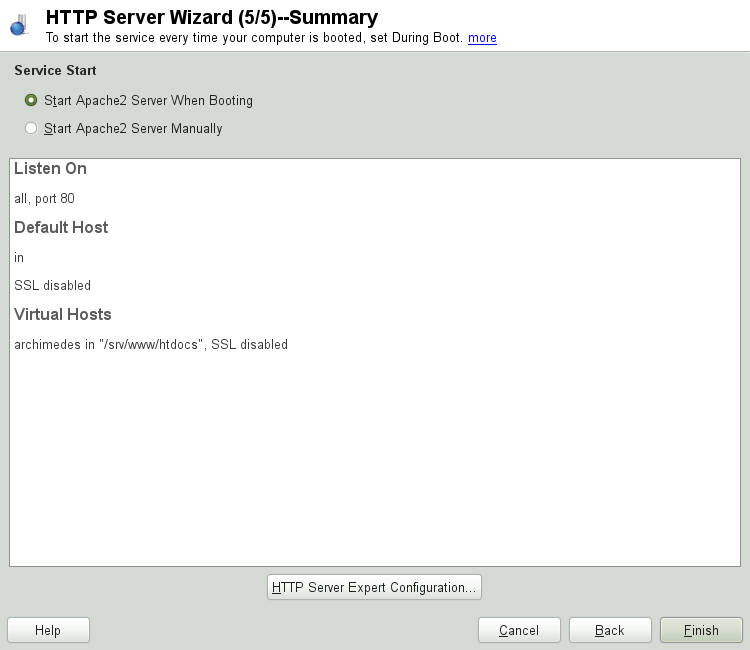
20.2.3.1.5. Summary
This is the final step of the wizard. Here, determine how and when the Apache server is started: when booting or manually. Also see a short summary of the configuration made so far. If you are satisfied with your settings, click to complete configuration. If you want to change something, click until you have reached the desired dialog. Clicking opens the dialog described in Section 20.2.3.2, « HTTP Server Configuration ».
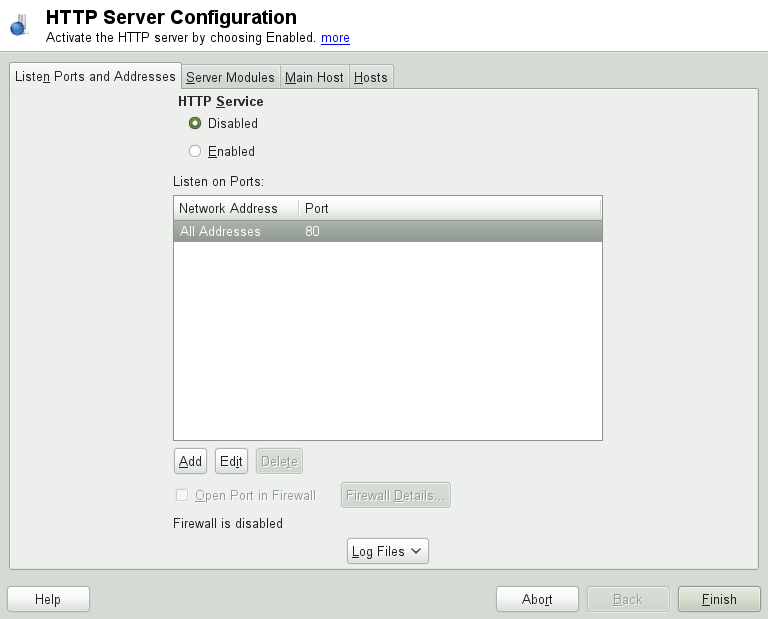
20.2.3.2. HTTP Server Configuration
The dialog also lets you make even more adjustments to the configuration than the wizard (which only runs if you configure your Web server for the first time). It consists of four tabs described in the following. No configuration option you change here is effective immediately—you always must confirm your changes with to make them effective. Clicking leaves the configuration module and discards your changes.
20.2.3.2.1. Listen Ports and Addresses
In , select whether Apache should be
running () or stopped
(). In ,
, , or
addresses and ports on which the server should
be available. The default is to listen on all interfaces on port
80. You should always check , because otherwise the Web server is not reachable
from outside. Keeping the port closed is only useful in test situations
where no external access to the Web server is necessary. If you have
multiple network interfaces, click to specify on which interface(s) the port(s) should
be opened.
With , watch either the access log or the error log. This is useful if you want to test your configuration. The log file opens in a separate window from which you can also restart or reload the Web server. For details, see Section 20.3, « Démarrage et arrêt d'Apache ». These commands are effective immediately and their log messages are also displayed immediately.
20.2.3.2.2. Server Modules
You can change the status (enabled or disabled) of Apache2 modules by clicking . Click to add a new module that is already installed but not yet listed. Learn more about modules in Section 20.4, « Installation, activation et configuration de modules ».

20.2.3.2.3. Main Host or Hosts
These dialogs are identical to the ones already described. Refer to Section 20.2.3.1.3, « Default Host » and Section 20.2.3.1.4, « Virtual Hosts ».
20.3. Démarrage et arrêt d'Apache
S'il est configuré avec YaST comme décrit dans Section 20.2.3, « Configuring Apache with YaST », Apache est lancé au démarrage aux niveaux d'exécution 3 et 5, et il est stoppé aux niveaux d'exécution 0, 1, 2 et 6. Vous pouvez modifier ce comportement en utilisant l'éditeur de niveaux d'exécution de YaST ou la ligne de commande chkconfig.
Pour démarrer, stopper, ou manipuler Apache sur un système en fonctionnement, utilisez le script d'initialisation /usr/sbin/rcapache2. La commande rcapache2 prend les paramètres suivants :
statusVérifie si Apache est démarré.
startDémarre Apache s'il n'est pas déjà en cours d'exécution.
startsslDémarre Apache avec le support de SSL s'il n'est pas déjà en cours d'exécution. Pour plus d'informations sur le support de SSL, référez-vous à Section 20.6, « Setting Up a Secure Web Server with SSL ».
stopArrête Apache en mettant fin au processus parent.
restartArrête puis redémarre Apache. Démarre le serveur web s'il n'était pas déjà en cours d'exécution.
try-restartArrête puis redémarre Apache uniquement s'il est déjà en cours d'exécution.
reloadougracefulArrête le serveur web en demandant à tous les processus dérivés d'Apache de d'abord terminer leurs requêtes avant l'extinction. Chaque processus mourant est remplacé par un nouveau processus, aboutissant à un « redémarrage » complet d'Apache.
Redémarrage d'Apache dans des environnements de production Pour activer les modifications dans la configuration d'Apache sans provoquer de rupture de connexion, utilisez la commande rcapache2
reload.restart-gracefulDémarre un second serveur web qui dessert automatiquement toutes les requêtes entrantes. L'instance précédente du serveur web continue de gérer toutes les requêtes existantes pour une période de temps définie configurée avec
GracefulShutdownTimeout.rcapache2
restart-gracefulest utile aussi bien lorsque vous migrer vers une nouvelle version que lorsque vous avez modifié des options de configuration qui nécessitent un redémarrage. L'utilisation de cette option garantit un temps d'arrêt du serveur minimal.GracefulShutdownTimeoutdoit être défini, sinonrestart-gracefulse traduira par un redémarrage classique. S'il est réglé sur zéro, le serveur attendra indéfiniment jusqu'à ce que toutes les requêtes restantes aient été entièrement desservies.Un redémarrage gracieux peut échouer si l'instance originale d'Apache n'est pas capable de libérer toutes les ressources nécessaires. Dans ce cas, la commande entrainera un arrêt gracieux.
stop-gracefulArrête le serveur web après une période de temps définie configurée avec
GracefulShutdownTimeoutafin de s'assurer que les requêtes existantes puissent être terminées.GracefulShutdownTimeoutdoit être défini, sinonstop-gracefulse traduira par un redémarrage classique. S'il est réglé sur zéro, le serveur attendra indéfiniment jusqu'à ce que toutes les requêtes restantes aient été entièrement desservies.configtestouextreme-configtestVérifie la syntaxe des fichiers de configuration sans affecter un serveur web en cours d'exécution. Étant donné que cette vérification est forcée à chaque fois que le serveur est démarré, relancé ou redémarré, il n'est généralement pas nécessaire d'exécuter le test explicitement (si une erreur de configuration est détectée, le serveur web n'est pas démarré, relancé ou redémarré). L'option
extreme-configtestdémarre le serveur web en tant qu'utilisateurnobodyet charge la configuration, permettant de détecter des erreurs supplémentaires. Notez que bien que la configuration soit chargée, il n'est pas possible de tester la configuration SSL car les certificats SSL ne peuvent pas être lus parnobody.probeProbes for the necessity of a reload (checks whether the configuration has changed) and suggests the required arguments for the rcapache2 command.
server-status and full-server-statusDumps a short or full status screen, respectively. Requires either lynx or w3m installed as well as the module
mod_statusenabled. In addition to that,statusmust be added toAPACHE_SERVER_FLAGSin the file/etc/sysconfig/apache2.
| Options supplémentaires |
|---|---|
Si vous spécifiez des options supplémentaires à rcapache2, ces dernières sont transmises au serveur web. | |
20.4. Installation, activation et configuration de modules
Le logiciel Apache est construit de façon modulaire : mis à part quelques tâches de base, toutes les fonctionnalités sont gérées par des modules. Cela a tellement progressé que même HTTP est géré par un module (http_core).
Les modules d'Apache peuvent être compilés dans le binaire d'Apache au moment de la compilation ou être chargés dynamiquement durant l'exécution. Reportez-vous à Section 20.4.2, « Activation et désactivation » pour plus de détails sur la façon de charger des modules dynamiquement.
Les modules d'Apache peuvent être divisés en quatre catégories différentes :
- Modules de base
Les modules de base sont compilés dans Apache par défaut. Apache dans openSUSE n'a que
mod_so(nécessaire pour charger d'autres modules) ethttp_corede compilés à l'intérieur. Tous les autres sont disponibles en tant qu'objets partagés : plutôt que d'être inclus dans le binaire du serveur, ils peuvent être inclus lors de l'exécution.- Modules d'extension
En général, les modules étiquetés en tant qu'extensions sont inclus dans le paquet logiciel Apache, mais ils ne sont généralement pas compilés statiquement dans le serveur. Dans openSUSE, ils sont disponibles sous forme d'objets partagés qui peuvent être chargés dans Apache lors de l'exécution.
- Modules externes
Les modules étiquetés comme externes ne sont pas inclus dans la distribution officielle d'Apache. Cependant, openSUSE fournit certains d'entre eux.
- Modules multi-processus (MPMs)
Les MPMs sont responsables de l'acceptation et de la gestion des requêtes vers le serveur web, représentant le cœur du logiciel de serveur web.
20.4.1. Installation d'un module
Si vous avez fait une installation par défaut comme décrit dans Section 20.1.2, « Installation », les modules suivants sont déjà installés : tous les modules de base et d'extension, le module multi-processus Prefork MPM, et les modules externes mod_php5 et mod_python.
Vous pouvez installer des modules externes supplémentaires en lançant YaST et en choisissant +. Choisissez maintenant + et cherchez apache. Parmi les autres paquets, la liste des résultats contient tous les modules externes disponibles pour Apache.
20.4.2. Activation et désactivation
Activez ou désactivez des modules particuliers soit manuellement, soit avec YaST. Dans YaST, les modules de langage de script (PHP5, Perl, and Python) doivent être activés ou désactivés avec la configuration du module comme décrit dans Section 20.2.3.1, « HTTP Server Wizard ». Tous les autres modules peuvent être activés ou désactivés comme décrit dans Section 20.2.3.2.2, « Server Modules ».
Si vous préférez activer ou désactiver les modules manuellement, utilisez respectivement les commandes a2enmod mod_foo ou a2dismod mod_foo. a2enmod -l affiche une liste de tous les modules actuellement activés.
| Inclusion de fichiers de configuration pour des modules externes |
|---|---|
Si vous avez activé des modules externes manuellement, assurez-vous de charger leurs fichiers de configuration dans toutes les configurations de virtualhosts. Les fichiers de configuration pour les modules externes sont situés dans | |
20.4.3. Modules de base et extensions
Tous les modules de base et d'extension sont décrits en détails dans la documentation Apache. Seule une brève description des principaux modules est disponible ici. Référez-vous à http://httpd.apache.org/docs/2.2/mod/ pour plus de détails sur chaque module.
mod_actionsFournit des méthodes pour exécuter un script à chaque fois qu'un certain type MIME (par exemple
application/pdf), un fichier avec une extension spécifique (comme.rpm), ou un certain type de méthode (commeGET) est demandé. Ce module est activé par défaut.mod_aliasFournit des directives
AliasetRedirectavec lesquelles vous pouvez mapper une URI vers un répertoire spécifique (Alias) ou rediriger une URL demandée vers un autre emplacement. Ce module est activé par défaut.mod_auth*Les modules d'authentification fournissent différentes méthodes d'authentification : l'authentification de base avec
mod_auth_basicou l'authentification digest avecmod_auth_digest. L'authentification digest est considérée comme expérimentale dans Apache 2.2.mod_auth_basicandmod_auth_digestmust be combined with an authentication provider module,mod_authn_*(for example,mod_authn_filefor text file–based authentication) and with an authorization modulemod_authz_*(for example,mod_authz_userfor user authorization).More information about this topic is available in the Authentication HOWTO at http://httpd.apache.org/docs/2.2/howto/auth.html.
mod_autoindexAutoindex génère des listings de répertoire quand aucun fichier index n'est présent (par exemple
index.html). L'apparence de ces listings est configurable. Ce module est activé par défaut. Cependant, les listings de répertoire sont désactivés par défaut via la directiveOptions—écrasez ce paramètre dans votre configuration de virtualhost. Le fichier de configuration par défaut pour ce module est situé dans/etc/apache2/mod_autoindex-defaults.conf.mod_cgimod_cgiest nécessaire pour exécuter des scripts CGI. Ce module est activé par défaut.mod_deflateGrâce à ce module, Apache peut être configuré pour compresser à la volée des types de fichier donnés avant de les délivrer.
mod_dirmod_dirfournit la directiveDirectoryIndexavec laquelle vous pouvez configurer les fichiers qui sont automatiquement délivrés quand un répertoire est demandé (par défaut,index.html). Il fournit également une redirection automatique vers la bonne URL lorsqu'un répertoire demandé ne contient pas de slash à la fin. Ce module est activé par défaut.mod_envContrôle l'environnement qui est transmis aux scripts CGI ou aux pages SSI. Les variables d'environnement peuvent être définies, supprimées ou transmises à partir du shell qui a lancé le processus httpd. Ce module est activé par défaut.
mod_expiresAvec
mod_expires, vous pouvez contrôler la fréquence avec laquelle le proxy et les caches de navigateur rafraichissent vos documents en envoyant une en-têteExpires. Ce module est activé par défaut.mod_includemod_includevous permet d'utiliser Server Side Includes (SSI), qui fournit une fonctionnalité de base pour générer des pages HTML dynamiquement. Ce module est activé par défaut.mod_infoFournit une vue générale de la configuration du serveur sous http://localhost/server-info/. Pour des raisons de sécurité, vous devriez toujours limiter l'accès à cette URL. Par défaut, seul
localhostest autorisé à accéder à cette URL.mod_infoest configuré dans/etc/apache2/mod_info.conf.mod_log_configAvec ce module, vous pouvez configurer l'aspect des fichiers log d'Apache. Ce module est activé par défaut.
mod_mimeLe module mime permet de s'assurer qu'un fichier est délivré avec une en-tête MIME correcte en fonction de l'extension du nom de fichier (par exemple
text/htmlpour les documents HTML). Ce module est activé par défaut.mod_negotiationNecessary for content negotiation. See http://httpd.apache.org/docs/2.2/content-negotiation.html for more information. This module is enabled by default.
mod_rewriteFournit la fonctionnalité de
mod_alias, mais offre plus de fonctionnalités et de flexibilité. Avecmod_rewrite, vous pouvez rediriger les URL en fonction de règles multiples, d'en-têtes de requête, et bien plus.mod_setenvifSets environment variables based on details of the client's request, such as the browser string the client sends, or the client's IP address. This module is enabled by default.
mod_spelingmod_spelingattempts to automatically correct typographical errors in URLs, such as capitalization errors.mod_sslEnables encrypted connections between Web server and clients. See Section 20.6, « Setting Up a Secure Web Server with SSL » for details. This module is enabled by default.
mod_statusProvides information on server activity and performance under http://localhost/server-status/. For security reasons, you should always limit access to this URL. By default, only
localhostis allowed to access this URL.mod_statusis configured at/etc/apache2/mod_status.confmod_suexecmod_suexeclets you run CGI scripts under a different user and group. This module is enabled by default.mod_userdirEnables user-specific directories available under
~. Theuser/UserDirdirective must be specified in the configuration. This module is enabled by default.
20.4.4. Modules multi-processus
openSUSE provides two different multiprocessing modules (MPMs) for use with Apache:
20.4.4.1. Prefork MPM
The prefork MPM implements a nonthreaded, preforking Web server. It makes the Web server behave similarly to Apache version 1.x. In this version it isolates each request and handles it by forking a separate child process. Thus problematic requests cannot affect others, avoiding a lockup of the Web server.
While providing stability with this process-based approach, the prefork MPM consumes more system resources than its counterpart, the worker MPM. The prefork MPM is considered the default MPM for Unix-based operating systems.
| MPMs in This Document |
|---|---|
This document assumes Apache is used with the prefork MPM. | |
20.4.4.2. Worker MPM
The worker MPM provides a multi-threaded Web server. A thread is a « lighter » form of a process. The advantage of a thread over a process is its lower resource consumption. Instead of only forking child processes, the worker MPM serves requests by using threads with server processes. The preforked child processes are multi-threaded. This approach makes Apache perform better by consuming fewer system resources than the prefork MPM.
One major disadvantage is the stability of the worker MPM: if a thread becomes corrupt, all threads of a process can be affected. In the worst case, this may result in a server crash. Especially when using the Common Gateway Interface (CGI) with Apache under heavy load, internal server errors might occur due to threads being unable to communicate with system resources. Another argument against using the worker MPM with Apache is that not all available Apache modules are thread-safe and thus cannot be used in conjunction with the worker MPM.
![[Warning]](static/images/warning.png) | Using PHP Modules with MPMs |
|---|---|
Not all available PHP modules are thread-safe. Using the worker MPM
with | |
20.4.5. Modules externes
Find a list of all external modules shipped with openSUSE here. Find the module's documentation in the listed directory.
- mod-apparmor
Adds support to Apache to provide AppArmor confinement to individual CGI scripts handled by modules like
mod_php5andmod_perl.Package Name: apache2-mod_apparmorPour plus d'informations : Partie « Confining Privileges with AppArmor » (↑Security Guide) mod_monoUsing
mod_monoallows you to run ASP.NET pages in your server.Package Name: apache2-mod_monoConfiguration File: /etc/apache2/conf.d/mod_mono.confmod_perlmod_perlenables you to run Perl scripts in an embedded interpreter. The persistent interpreter embedded in the server avoids the overhead of starting an external interpreter and the penalty of Perl start-up time.Package Name: apache2-mod_perlConfiguration File: /etc/apache2/conf.d/mod_perl.confPour plus d'informations : /usr/share/doc/packages/apache2-mod_perlmod_php5PHP is a server-side, cross-platform HTML embedded scripting language.
Package Name: apache2-mod_php5Configuration File: /etc/apache2/conf.d/php5.confPour plus d'informations : /usr/share/doc/packages/apache2-mod_php5mod_pythonmod_pythonallows embedding Python within the Apache HTTP server for a considerable boost in performance and added flexibility in designing Web-based applications.Package Name: apache2-mod_pythonPour plus d'informations : /usr/share/doc/packages/apache2-mod_pythonmod_tidymod_tidyvalidates each outgoing HTML page by means of the TidyLib. In case of a validation error, a page with an error list is delivered. Otherwise the original HTML page is delivered.Package Name: apache2-mod_tidyConfiguration File: /etc/apache2/mod_tidy.confPour plus d'informations : /usr/share/doc/packages/apache2-mod_tidy
20.4.6. Compilation
Apache can be extended by advanced users by writing custom modules. To
develop modules for Apache or compile third-party modules, the package
apache2-devel is required along with the
corresponding development tools. apache2-devel
also contains the apxs2 tools, which are necessary
for compiling additional modules for Apache.
apxs2 enables the compilation and installation of modules from source code (including the required changes to the configuration files), which creates dynamic shared objects (DSOs) that can be loaded into Apache at runtime.
The apxs2 binaries are located under
/usr/sbin:
/usr/sbin/apxs2—suitable for building an extension module that works with any MPM. The installation location is/usr/lib/apache2./usr/sbin/apxs2-prefork—suitable for prefork MPM modules. The installation location is/usr/lib/apache2-prefork./usr/sbin/apxs2-worker—suitable for worker MPM modules. The installation location is/usr/lib/apache2-worker.
Install and activate a module from source code with the following commands:
cd /path/to/module/source; apxs2 -cia
    mod_foo.c
where -c compiles the module, -i
installs it, and -a activates it. Other options of
apxs2 are described in the
apxs2(1) man page.
20.5. Getting CGI Scripts to Work
Apache's Common Gateway Interface (CGI) lets you create dynamic content with programs or scripts usually referred to as CGI scripts. CGI scripts can be written in any programming language. Usually, script languages such as Perl or PHP are used.
To enable Apache to deliver content created by CGI scripts,
mod_cgi needs to be activated.
mod_alias is also needed. Both modules are
enabled by default. Refer to
Section 20.4.2, « Activation et désactivation » for details on
activating modules.
| CGI Security |
|---|---|
Allowing the server to execute CGI scripts is a potential security hole. Refer to Section 20.7, « Avoiding Security Problems » for additional information. | |
20.5.1. Apache Configuration
In openSUSE, the execution of CGI scripts is only allowed in the
directory /srv/www/cgi-bin/. This location is
already configured to execute CGI scripts. If you have created a virtual
host configuration (see
Section 20.2.2.1, « Configuration de virtualhost ») and
want to place your scripts in a host-specific directory, you must unlock
and configure this directory.
Exemple 20.5. VirtualHost CGI Configuration
ScriptAlias /cgi-bin/ "/srv/www/www.example.com/cgi-bin/"<Directory "/srv/www/www.example.com/cgi-bin/"> Options +ExecCGI
AddHandler cgi-script .cgi .pl
Order allow,deny
Allow from all </Directory>
| Tells Apache to handle all files within this directory as CGI scripts. |
| Enables CGI script execution |
| Tells the server to treat files with the extensions .pl and .cgi as CGI scripts. Adjust according to your needs. |
|
The |
20.5.2. Running an Example Script
CGI programming differs from "regular" programming in that the CGI
programs and scripts must be preceded by a MIME-Type header such as
Content-type: text/html. This header is sent to the
client, so it understands what kind of content it receives. Secondly,
the script's output must be something the client, usually a Web browser,
understands—HTML in most cases or plain text or images, for
example.
A simple test script available under
/usr/share/doc/packages/apache2/test-cgi is part of
the Apache package. It outputs the content of some environment variables
as plain text. Copy this script to either
/srv/www/cgi-bin/ or the script directory of your
virtual host (/srv/www/www.example.com/cgi-bin/) and name
it test.cgi.
Files accessible by the Web server should be owned by the user
root. For additional
information see Section 20.7, « Avoiding Security Problems ». Because the Web
server runs with a different user, the CGI scripts must be
world-executable and world-readable. Change into the CGI directory and
use the command chmod 755 test.cgi to apply the
proper permissions.
Now call http://localhost/cgi-bin/test.cgi or
http://www.example.com/cgi-bin/test.cgi. You should see the
« CGI/1.0 test script report ».
20.5.3. CGI Troubleshooting
If you do not see the output of the test program but an error message instead, check the following:
CGI Troubleshooting
Have you reloaded the server after having changed the configuration? Check with rcapache2 probe.
If you have configured your custom CGI directory, is it configured properly? If in doubt, try the script within the default CGI directory
/srv/www/cgi-bin/and call it withhttp://localhost/cgi-bin/test.cgi.Are the file permissions correct? Change into the CGI directory and execute ls -l test.cgi. Its output should start with
-rwxr-xr-x 1 root root
Make sure that the script does not contain programming errors. If you have not changed
test.cgi, this should not be the case, but if you are using your own programs, always make sure that they do not contain programming errors.
20.6. Setting Up a Secure Web Server with SSL
Whenever sensitive data, such as credit card information, is transferred
between Web server and client, it is desirable to have a secure,
encrypted connection with authentication.
mod_ssl provides strong encryption using the
secure sockets layer (SSL) and transport layer security (TLS) protocols
for HTTP communication between a client and the Web server. Using
SSL/TSL, a private connection between Web server and client is
established. Data integrity is ensured and client and server are able to
authenticate each other.
For this purpose, the server sends an SSL certificate that holds information proving the server's valid identity before any request to a URL is answered. In turn, this guarantees that the server is the uniquely correct end point for the communication. Additionally, the certificate generates an encrypted connection between client and server that can transport information without the risk of exposing sensitive, plain-text content.
mod_ssl does not implement the SSL/TSL protocols
itself, but acts as an interface between Apache and an SSL library. In
openSUSE, the OpenSSL library is used. OpenSSL is automatically
installed with Apache.
The most visible effect of using mod_ssl with
Apache is that URLs are prefixed with https:// instead
of http://.
| Example Certificate |
|---|---|
An example certificate for a hypothetical company « Snake
Oil » is available when installing the package
| |
20.6.1. Creating an SSL Certificate
In order to use SSL/TSL with the Web server, you need to create an SSL certificate. This certificate is needed for the authorization between Web server and client, so that each party can clearly identify the other party. To ensure the integrity of the certificate, it must be signed by a party every user trusts.
There are three types of certificates you can create: a « dummy » certificate for testing purposes only, a self-signed certificate for a defined circle of users that trust you, and a certificate signed by an independent, publicly-known certificate authority (CA).
Creating a certificate is basically a two step process. First, a private key for the certificate authority is generated then the server certificate is signed with this key.
| For More Information |
|---|---|
To learn more about concepts and definitions of SSL/TSL, refer to http://httpd.apache.org/docs/2.2/ssl/ssl_intro.html. | |
20.6.1.1. Creating a « Dummy » Certificate
Generating a dummy certificate is simple. Just call the script
/usr/bin/gensslcert. It creates or overwrites the
files listed below. Make use of gensslcert's
optional switches to fine-tune the certificate. Call
/usr/bin/gensslcert -h for
more information.
/etc/apache2/ssl.crt/ca.crt/etc/apache2/ssl.crt/server.crt/etc/apache2/ssl.key/server.key/etc/apache2/ssl.csr/server.csr/root/.mkcert.cfg
A copy of ca.crt is also placed at
/srv/www/htdocs/CA.crt for download.
| For Testing Purposes Only |
|---|---|
A dummy certificate should never be used on a production system. Only use it for testing purposes. | |
20.6.1.2. Creating a Self-Signed Certificate
If you are setting up a secure Web server for an Intranet or for a defined circle of users, it might be sufficient if you sign a certificate with your own certificate authority (CA).
Creating a self-signed certificate is an interactive nine-step process.
Change into the directory
/usr/share/doc/packages/apache2 and run the
following command: ./mkcert.sh
make --no-print-directory /usr/bin/openssl /usr/sbin/
custom. Do not attempt to run this command from
outside this directory. The program provides a series of prompts, some
of which require user input.
Procédure 20.4. Creating a Self-Signed Certificate with mkcert.sh
Decide the signature algorithm used for certificatesChoose RSA (R, the default), because some older browsers have problems with DSA.
Generating RSA private key for CA (1024 bit)No interaction needed.
Generating X.509 certificate signing request for
       CA
Create the CA's distinguished name here. This requires you to answer a few questions, such as country name or organization name. Enter valid data, because everything you enter here later shows up in the certificate. You do not need to answer every question. If one does not apply to you or you want to leave it blank, use « . ». Common name is the name of the CA itself—choose a significant name, such as
My companyCA.Common Name of the CA The common name of the CA must be different from the server's common name, so do not choose the fully qualified hostname in this step.
Generating X.509 certificate for CA signed by
       itself
Choose certificate version 3 (the default).
Generating RSA private key for SERVER (1024 bit)No interaction needed.
Generating X.509 certificate signing request for
       SERVER
Create the distinguished name for the server key here. Questions are almost identical to the ones already answered for the CA's distinguished name. The data entered here applies to the Web server and does not necessarily need to be identical to the CA's data (for example, if the server is located elsewhere).
Selecting a Common Name The common name you enter here must be the fully qualified hostname of your secure server (for example, www.example.com). Otherwise the browser issues a warning that the certificate does not match the server when accessing the Web server.
Generating X.509 certificate signed by own CAChoose certificate version 3 (the default).
Encrypting RSA private key of CA with a passphrase for
       security
It is strongly recommended to encrypt the private key of the CA with a password, so choose Y and enter a password.
Encrypting RSA private key of SERVER with a passphrase for
       security
Encrypting the server key with a password requires you to enter this password every time you start the Web server. This makes it difficult to automatically start the server on boot or to restart the Web server. Therefore, it is common sense to say N to this question. Keep in mind that your key is unprotected when not encrypted with a password and make sure that only authorized persons have access to the key.
Encrypting the Server Key If you choose to encrypt the server key with a password, increase the value for
APACHE_TIMEOUTin/etc/sysconfig/apache2. Otherwise you do not have enough time to enter the passphrase before the attempt to start the server is stopped unsuccessfully.
The script's result page presents a list of certificates and keys it
has generated. Contrary to what the script outputs, the files have not
been generated in the local directory conf, but to
the correct locations under /etc/apache2/.
The last step is to copy the CA certificate file from
/etc/apache2/ssl.crt/ca.crt to a location where
your users can access it in order to incorporate it into the list of
known and trusted CAs in their Web browsers. Otherwise a browser
complains that the certificate was issued by an unknown authority. The
certificate is valid for one year.
| Self-Signed Certificates |
|---|---|
Only use a self-signed certificate on a Web server that is accessed by people who know and trust you as a certificate authority. It is not recommended to use such a certificate for a public shop, for example. | |
20.6.1.3. Getting an Officially Signed Certificate
There are a number of official certificate authorities that sign your certificates. The certificate is signed by a trustworthy third party, so can be fully trusted. Publicly operating secure Web servers usually have got an officially signed certificate.
The best-known official CAs are Thawte (http://www.thawte.com/) or Verisign (http://www.verisign.com). These and other CAs are already compiled into all browsers, so certificates signed by these certificate authorities are automatically accepted by the browser.
When requesting an officially signed certificate, you do not send a certificate to the CA. Instead, issue a Certificate Signing Request (CSR). To create a CSR, call the script /usr/share/ssl/misc/CA.sh -newreq.
First the script asks for a password with which the CSR should be
encrypted. Then you are asked to enter a distinguished name. This
requires you to answer a few questions, such as country name or
organization name. Enter valid data—everything you enter here
later shows up in the certificate and is checked. You do not need to
answer every question. If one does not apply to you or you want to
leave it blank, use « . ». Common name is the name of the CA
itself—choose a significant name, such as My
company CA. Last, a challenge password and an alternative
company name must be entered.
Find the CSR in the directory from which you called the script. The
file is named newreq.pem.
20.6.2. Configuring Apache with SSL
The default port for SSL and TLS requests on the Web server side is 443. There is no conflict between a « regular » Apache listening on port 80 and an SSL/TLS-enabled Apache listening on port 443. In fact, HTTP and HTTPS can be run with the same Apache instance. Usually separate virtual hosts are used to dispatch requests to port 80 and port 443 to separate virtual servers.
| Firewall Configuration |
|---|---|
Do not forget to open the firewall for SSL-enabled Apache on port 443. This can be done with YaST as described in section « Configuring the Firewall with YaST » (Chapitre 13, Masquerading and Firewalls, ↑Security Guide). | |
The SSL module is enabled by default in the global server configuration.
In case it has been disabled on your host, activate it with the
following command: a2enmod ssl. To finally enable
SSL, the server needs to be started with the flag « SSL ». To
do so, call a2enflag SSL. If you have chosen to
encrypt your server certificate with a password, you should also
increase the value for APACHE_TIMEOUT in
/etc/sysconfig/apache2, so you have enough time to
enter the passphrase when Apache starts. Restart the server to make
these changes active. A reload is not sufficient.
The virtual host configuration directory contains a template
/etc/apache2/vhosts.d/vhost-ssl.template with
SSL-specific directives that are extensively documented. Refer to
Section 20.2.2.1, « Configuration de virtualhost » for the
general virtual host configuration.
To get started, copy the template to
/etc/apache2/vhosts.d/
and edit it. Adjusting the values for the following directives should be
sufficient:
mySSL-host.conf
DocumentRootServerNameServerAdminErrorLogTransferLog
20.6.2.1. Name-Based Virtual Hosts and SSL
By default it is not possible to run multiple SSL-enabled virtual hosts on a server with only one IP address. Name-based virtual hosting requires that Apache knows which server name has been requested. The problem with SSL connections is, that such a request can only be read after the SSL connection has already been established (by using the default virtual host). As a result, users will receive a warning message stating that the certificate does not match the server name.
openSUSE comes with an extension to the SSL protocol called Server Name Indication (SNI) addresses this issue by sending the name of the virtual domain as part of the SSL negotiation. This enables the server to « switch » to the correct virtual domain early and present the browser the correct certificate.
SNI is enabled by default on openSUSE. In order to enable
Name-Based Virtual Hosts for SSL, configure the server as described in
Section 20.2.2.1.1, « Virtualhosts basés sur le nom »
(note that you need to use port 443 rather than port
80 with SSL).
| SNI Browser Support |
|---|---|
SNI must also be supported on the client side. Although SNI is supported by most browsers, some browsers for mobile hardware as well as Internet Explorer and Safari on Windows* XP lack SNI support. See http://en.wikipedia.org/wiki/Server_Name_Indication for details.
Configure how to handle non-SNI capable browser with the directive
When set to | |
20.7. Avoiding Security Problems
A Web server exposed to the public Internet requires an ongoing administrative effort. It is inevitable that security issues appear, both related to the software and to accidental misconfiguration. Here are some tips for how to deal with them.
20.7.1. Up-to-Date Software
If there are vulnerabilities found in the Apache software, a security advisory will be issued by SUSE. It contains instructions for fixing the vulnerabilities, which in turn should be applied as soon as possible. The SUSE security announcements are available from the following locations:
Web Page. http://www.novell.com/linux/security/securitysupport.html
Mailing List Archive. http://lists.opensuse.org/opensuse-security-announce/
RSS Feed. http://www.novell.com/linux/security/suse_security.xml
20.7.2. DocumentRoot Permissions
By default in openSUSE, the DocumentRoot
directory /srv/www/htdocs and the CGI directory
/srv/www/cgi-bin belong to the user and group
root. You should not change these permissions.
If the directories are writable for all, any user can place files into
them. These files might then be executed by Apache with the permissions
of wwwrun, which may give the user unintended
access to file system resources. Use subdirectories of
/srv/www to place the
DocumentRoot and CGI directories for your
virtual hosts and make sure that directories and files belong to user
and group root.
20.7.3. File System Access
By default, access to the whole file system is denied in
/etc/apache2/httpd.conf. You should never overwrite
these directives, but specifically enable access to all directories
Apache should be able to read. For details, see
Section 20.2.2.1.3, « Configuration de virtualhost basique ».
In doing so, ensure that no critical files, such as password or system
configuration files, can be read from the outside.
20.7.4. CGI Scripts
Interactive scripts in Perl, PHP, SSI, or any other programming language can essentially run arbitrary commands and therefore present a general security issue. Scripts that will be executed from the server should only be installed from sources the server administrator trusts—allowing users to run their own scripts is generally not a good idea. It is also recommended to do security audits for all scripts.
To make the administration of scripts as easy as possible, it is common
practice to limit the execution of CGI scripts to specific directories
instead of globally allowing them. The directives
ScriptAlias and Option
ExecCGI are used for configuration. The openSUSE
default configuration does not allow execution of CGI scripts from
everywhere.
All CGI scripts run as the same user, so different scripts can potentially conflict with each other. The module suEXEC lets you run CGI scripts under a different user and group.
20.7.5. User Directories
When enabling user directories (with
mod_userdir or
mod_rewrite) you should strongly consider not
allowing .htaccess files, which would allow users
to overwrite security settings. At least you should limit the user's
engagement by using the directive
AllowOverRide. In openSUSE,
.htaccess files are enabled by default, but the
user is not allowed to overwrite any Option
directives when using mod_userdir (see the
/etc/apache2/mod_userdir.conf configuration file).
20.8. Troubleshooting
If Apache does not start, the Web page is not accessible, or users cannot connect to the Web server, it is important to find the cause of the problem. Here are some typical places to look for error explanations and important things to check:
- Output of rcapache2
Instead of starting and stopping the Web server with the binary
/usr/sbin/httpd2, rather use the rcapache2 script instead (described in Section 20.3, « Démarrage et arrêt d'Apache »). It is verbose about errors, and it even provides tips and hints for fixing configuration errors.- Log Files and Verbosity
In case of both fatal and nonfatal errors, check the Apache log files for causes, mainly the error log file located at
/var/log/apache2/error_logby default. Additionally, you can control the verbosity of the logged messages with theLogLeveldirective if more detail is needed in the log files.A Simple Test Watch the Apache log messages with the command tail -F /var/log/apache2/
my_error_log. Then run rcapache2 restart. Now, try to connect with a browser and check the output.- Firewall and Ports
A common mistake is to not open the ports for Apache in the firewall configuration of the server. If you configure Apache with YaST, there is a separate option available to take care of this specific issue (see Section 20.2.3, « Configuring Apache with YaST »). If you are configuring Apache manually, open firewall ports for HTTP and HTTPS via YaST's firewall module.
If the error cannot be tracked down with the help of any these, check the online Apache bug database at http://httpd.apache.org/bug_report.html. Additionally, the Apache user community can be reached via a mailing list available at http://httpd.apache.org/userslist.html. A recommended newsgroup is comp.infosystems.www.servers.unix.
20.9. For More Information
The package apache2-doc contains the complete
Apache manual in various localizations for local installation and
reference. It is not installed by default—the quickest way to
install it is to use the command zypper in
apache2-doc. Once installed, the Apache manual is available at
http://localhost/manual/. You may also access it on
the Web at http://httpd.apache.org/docs-2.2/.
SUSE-specific configuration hints are available in the directory
/usr/share/doc/packages/apache2/README.*.
20.9.1. Apache 2.2
For a list of new features in Apache 2.2, refer to http://httpd.apache.org/docs/2.2/new_features_2_2.html. Information about upgrading from version 2.0 to 2.2 is available at http://httpd.apache.org/docs-2.2/upgrading.html.
20.9.2. Apache Modules
More information about external Apache modules that are briefly described in Section 20.4.5, « Modules externes » is available at the following locations:
- mod-apparmor
mod_monomod_perlmod_php5mod_pythonmod_tidy
20.9.3. Développement
More information about developing Apache modules or about getting involved in the Apache Web server project are available at the following locations:
- Apache Developer Information
- Apache Developer Documentation
- Writing Apache Modules with Perl and C
20.9.4. Miscellaneous Sources
If you experience difficulties specific to Apache in openSUSE, take a look at the openSUSE wiki at http://old-en.opensuse.org/Apache. The history of Apache is provided at http://httpd.apache.org/ABOUT_APACHE.html. This page also explains why the server is called Apache.