Chapitre 25. Using NetworkManager
Table des matières
- 25.1. Use Cases for NetworkManager
- 25.2. Enabling or Disabling NetworkManager
- 25.3. Configuring Network Connections
- 25.4. Using the KDE NetworkManager Front-End
- 25.5. Using GNOME NetworkManager
- 25.6. NetworkManager and VPN
- 25.7. NetworkManager and Security
- 25.8. Frequently Asked Questions
- 25.9. Troubleshooting
- 25.10. For More Information
NetworkManager is the ideal solution for laptops and other portable computers. It supports state-of-the-art encryption types and standards for network connections, including connections to 802.1X protected networks. 802.1X is the « IEEE Standard for Local and Metropolitan Area Networks—Port-Based Network Access Control ». With NetworkManager, you need not worry about configuring network interfaces and switching between wired or wireless networks when you are moving. NetworkManager can automatically connect to known wireless networks or manage several network connections in parallel—the fastest connection is then used as default. Furthermore, you can manually switch between available networks and manage your network connection using an icon in the system tray or in the top bar, respectively.
Instead of only one connection being active, multiple connections may be active at once. This enables you to unplug your laptop from an Ethernet and remain connected via a wireless connection.
25.1. Use Cases for NetworkManager
NetworkManager provides a sophisticated and intuitive user interface, which enables users to easily switch their network environment. However, NetworkManager is not a suitable solution in the following cases:
Your computer provides network services for other computers in your network, for example, it is a DHCP or DNS server.
Your computer is a Xen server or your system is a virtual system inside Xen.
25.2. Enabling or Disabling NetworkManager
On laptop computers, NetworkManager is enabled by default. However, it can be at any time enabled or disabled in the YaST Network Settings module.
Run YaST and go to +.
The dialog opens. Go to the tab.
To configure and manage your network connections with NetworkManager:
In the field, select .
Click and close YaST.
Configure your network connections with NetworkManager as described in Section 25.3, « Configuring Network Connections ».
To deactivate NetworkManager and control network the traditional way:
In the field, choose .
Click .
Set up your network card with YaST using automatic configuration via DHCP or a static IP address. Alternatively, configure your modem with YaST:
For dial-up connections, use +.
To configure an internal or USB ISDN modem, select +.
To configure an internal or USB DSL modem, select +.
Find a detailed description of the network configuration with YaST in Section 13.4, « Configuring a Network Connection with YaST » and Chapitre 24, Wireless LAN.
25.3. Configuring Network Connections
After having enabled NetworkManager in YaST, configure your network connections with the NetworkManager front-ends available in KDE and GNOME. The network configuration dialogs for both front-ends are very similar. They show tabs for all types of network connections, such as wired, wireless, mobile broadband, DSL, and VPN connections. On each tab, you can add, edit or delete connections of that type. If you hover the mouse pointer over the input fields and options, comprehensive tooltips are displayed. In the KDE configuration dialog, the appropriate tabs are only active if the connection type is available on your system (depending on hardware and software).
![[Note]](static/images/note.png) | Bluetooth Connections |
|---|---|
Currently, Bluetooth connections cannot be configured with NetworkManager. | |
To open the network configuration dialog in GNOME, press Alt+F2 and enter nm-connection-editor.
If you are using KDE, open the main menu and click . In the section select + to open the network configuration dialog.
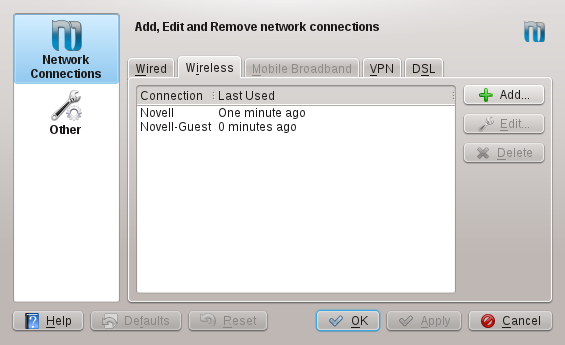
Alternatively, you can also start the configuration dialogs from the NetworkManager front-end in the system tray or the top bar, respectively. In KDE, left-click the icon and select . In GNOME, click the icon and select +.
| Availability of Options |
|---|---|
Depending on your system setup, you may not be allowed to configure
connections. In a secured environment, some options might be locked or
require | |
Procédure 25.1. Adding or Editing Connections
When configuring network connections with NetworkManager, you can also define
system connections that can be shared by all users.
In contrast to user connections, system connections
are made available right after NetworkManager is started—before any users
log in. For more details about both types of connections, refer to
Section 25.7.1, « User and System Connections ».
| Hidden Networks |
|---|---|
To connect to a « hidden » network (a network that does not broadcast its service) you have to know the Service Set Identifier (SSID) or Extended Service Set Identifier (ESSID) of the network. Hidden networks cannot be detected automatically. | |
In the network configuration dialog, click the tab for the connection type you want to use.
Click to create a new connection or select an existing connection and click .
Enter a and your connection details.
You can tie the connection to a certain device, if more than one physical device per connection type is available (for example, your machine is equipped with two ethernet cards or two wireless cards).
If you are using KDE, do so by using the option. If you are using use GNOME, enter the of the device you want to tie the connection to and confirm your settings.
For NetworkManager to automatically use a certain connection, activate the following option for this connection: (KDE) or (GNOME).
To turn a connection into a
system connectionactivate (KDE) or (GNOME). To create and edit system connections,rootpermission is required.
After having confirmed your changes, the newly configured network connection appears in the list of available networks you get by left-clicking the NetworkManager icon.

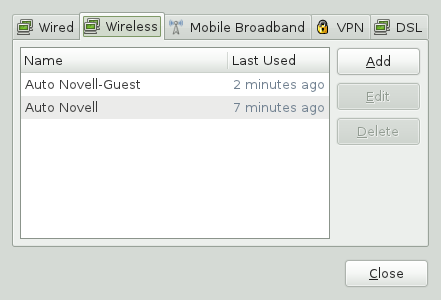
25.4. Using the KDE NetworkManager Front-End
The KDE front-end for NetworkManager is the NetworkManager plasmoid. If the network has been set up for NetworkManager control, the plasmoid usually starts automatically with the desktop environment and is shown as an icon in the system tray.
If your system tray does not show any network connection icon, the plasmoid is probably not started. Click the and choose . Double-click the entry and click the again.
The NetworkManager front-end only shows wireless networks for which you have configured a connection. It hides connections when you are out of range of a wireless network, or when the network cable is disconnected, thus always giving you a clear view of which connections may be used.
25.4.1. Managing Wired Network Connections
If your computer is connected to an existing network with a network cable, use the NetworkManager front-end to manage the network connection(s).
Left-click the NetworkManager icon to show a list with available on the left-hand side and on the right-hand side. The connections currently being used are shown in bold in the list.
For detailed information and statistics for an interface, click the respective entry on the left-hand side of the plasmoid. Switch back to the interface overview by clicking the blue arrow icon.
To disconnect an active connection, click the red icon next to the respective entry.
If you want to use a different configuration with the wired network, click and add another wired connection as described in Procédure 25.1, « Adding or Editing Connections ». Click the NetworkManager icon and select the newly configured connection to activate it.
To switch off all network connections, both wired and wireless, click the NetworkManager icon and uncheck .
25.4.2. Managing Wireless Network Connections
By default the NetworkManager front-end only lists connections that are already configured. The signal strength of each network is indicated by a series of bars, each one representing 10%. Encrypted wireless networks are marked with a green (WPA) or yellow (WEP) shield, while open networks are marked with a red shield.
Procédure 25.2. Connecting to a Wireless Network
Click to display all visible wireless networks available.
Left-click on the network of your choice to open the network connection dialog. To connect to a network that does not broadcast its service set identifier (SSID or ESSID), click . Fill in the connection details and press Entrée.
Based on your security settings for NetworkManager (see Section 25.7.2, « Storing Passwords and Credentials » for details), you may have to provide your KWallet password.
NetworkManager automatically connects to the configured network.
Procédure 25.3. Managing Active Wireless Connections
Click a listed in the right half of the plasmoid window to get detailed information and statistics for that interface.
Switch back to the interface overview by clicking on the blue arrow icon.
To disconnect an active connection, click the red icon for the .
To completely disable wireless networking, uncheck . This can be useful if you are on a plane or in any other environment where wireless networking is not allowed.

A wireless network that has been chosen explicitly will remain connected as long as possible. If a network cable is plugged in during that time, any connections that have been set to will be connected, while the wireless connection remains up.
25.4.3. Configuring Your Wireless Card as an Access Point
If your wireless card supports access point mode, you can use NetworkManager for configuration.
| Availability of Options |
|---|---|
Depending on your system setup, you may not be allowed to configure
connections. In a secured environment, some options might be locked or
require | |
Start the dialog for configuring network connections as described in Section 25.3, « Configuring Network Connections ».
Click +.
On the tab provide a for the shared wireless network and a .
Set the encryption on the tab.
![[Important]](static/images/important.png)
Unprotected Wireless Networks Are a Security Risk If you set to
None, everybody can connect to your network, reuse your connectivity and intercept your network connection. To restrict access to your access point and to secure your connection, use encryption. You can choose between various WEP and WPA–based encryptions. If you are not sure which technology is best for you, read Section 24.3, « Authentication ».Confirm your configuration with .
25.5. Using GNOME NetworkManager
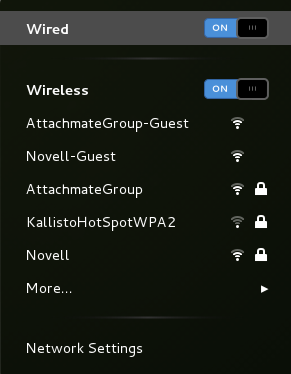
In GNOME, NetworkManager can be controlled with the GNOME NetworkManager icon. If the network is set up for NetworkManager control, the icon is automatically shown in the top bar.
If your top bar does not show any network connection icon, GNOME NetworkManager is probably not started. Press Alt+F2 and enter nm-applet to start it manually.
25.5.1. Managing Wired Network Connections
If your computer is connected to an existing network with a network cable, use the NetworkManager icon to choose the network connection.
Click the icon to show a menu with available networks. The currently used connection is listed on top of the menu, followed by other active connections.
Click to get detailed information on all active interfaces.
To disconnect an active connection, click the button next to .
If you want to use a different configuration with the wired network, open the network configuration dialog and add another wired connection as described in Procédure 25.1, « Adding or Editing Connections ». Click the NetworkManager icon and select the newly configured connection to activate it.
To switch off all network connections, both wired and wireless, right-click the icon and uncheck .
25.5.2. Managing Wireless Network Connections
GNOME NetworkManager lists a number of available visible wireless networks. To extend the list, click . The signal strength of each network is also shown in the menu. Encrypted wireless networks are marked with a lock icon.
Procédure 25.4. Connecting to a Wireless Network
To connect to a wireless network, click the NetworkManager icon and choose an entry from the list of available wireless networks.
If the network is encrypted, a dialog opens. It shows the type of encryption the network uses () and holds a number of input fields according to the respective encryption and authentication settings. Enter the appropriate credentials.
To connect to a network that does not broadcast its service set identifier (SSID or ESSID), and therefore cannot be detected automatically, click the NetworkManager icon and choose ++.
In the dialog that opens, enter the connection details and click .
To disable wireless networking, click the icon and click the button next to . This can be useful if you are on a plane or in any other environment where wireless networking is not allowed.
A wireless network that has been chosen explicitly will remain connected as long as possible. If a network cable is plugged in during that time, any connections that have been set to will be connected, while the wireless connection remains up.
25.5.3. Configuring Your Wireless Card as an Access Point
If your wireless card supports access point mode, you can use NetworkManager for configuration.
| Availability of Options |
|---|---|
Depending on your system set-up, you may not be allowed to configure
connections. In a secured environment, some options might be locked or
require | |
Click the NetworkManager icon and select .
Click , confirm the pop-up and enter the
rootpassword to continue.A (SSID) and a are automatically generated and shown in the dialog. The network name will be based on the hostname of your computer. Other devices will need this information to connect to the hotspot that you have created.
Unprotected Wireless Networks Are a Security Risk To restrict access to your access point and to secure your connection, use encryption. Depending on the abilities of your network card, you can choose between various WEP and WPA–based encryptions. If you are not sure which technology is best for you, read Section 24.3, « Authentication ».
To change the SSID, encryption options (WEP, WPA, etc.) or the security key of the hotspot:
Click next to the button.
Enter the
rootpassword to continue.Change the SSID on the tab or the encryption details on the tab.
WEP 40/128-bit Key (Hex or ASCII) When using
WEP 40/128-bit Keyas encryption method, the length is restricted to either5,10, or13characters. Otherwise the button is inactive.Confirm your changes. After a short delay, the dialog will show your changes.
To stop the hotspot and disconnect any users, click and confirm your choice in the pop-up dialog.
25.6. NetworkManager and VPN
NetworkManager supports several Virtual Private Network (VPN) technologies. For each technology, openSUSE comes with a base package providing the generic support for NetworkManager. In addition to that, you also need to install the respective desktop-specific package for your front-end.
- NovellVPN
To use this VPN technology, install
NetworkManager-novellvpnandNetworkManager-novellvpn-kde4orNetworkManager-novellvpn-gnome.
NovellVPN support for KDE is not available yet, but is currently being worked on.
- OpenVPN
To use this VPN technology, install
NetworkManager-openvpnandNetworkManager-openvpn-kde4orNetworkManager-openvpn-gnome.
- vpnc (Cisco)
To use this VPN technology, install
NetworkManager-vpncandNetworkManager-vpnc-kde4orNetworkManager-vpnc-gnome.
- PPTP (Point-to-Point Tunneling Protocol)
To use this VPN technology, install
NetworkManager-pptpandNetworkManager-pptp-kde4orNetworkManager-pptp-gnome.
After you have installed the packages, configure your VPN connection as described in Section 25.3, « Configuring Network Connections ».
25.7. NetworkManager and Security
NetworkManager distinguishes two types of wireless connections, trusted and untrusted. A trusted connection is any network that you explicitly selected in the past. All others are untrusted. Trusted connections are identified by the name and MAC address of the access point. Using the MAC address ensures that you cannot use a different access point with the name of your trusted connection.
NetworkManager periodically scans for available wireless networks. If multiple trusted networks are found, the most recently used is automatically selected. NetworkManager waits for your selection in case that all networks are untrusted.
If the encryption setting changes but the name and MAC address remain the same, NetworkManager attempts to connect, but first you are asked to confirm the new encryption settings and provide any updates, such as a new key.
If you switch from using a wireless connection to offline mode, NetworkManager blanks the SSID or ESSID. This ensures that the card is disconnected.
25.7.1. User and System Connections
NetworkManager knows two types of connections: user and
system connections. User connections are connections
that become available to NetworkManager when the first user logs in. Any required
credentials are asked from the user and when the user logs out, the
connections are disconnected and removed from NetworkManager. Connections that are
defined as system connection can be shared by all users and are made
available right after NetworkManager is started—before any users log in. In
case of system connections, all credentials must be provided at the time
the connection is created. Such system connections can be used to
automatically connect to networks that require authorization. For
information how to configure user or system connections with NetworkManager, refer
to Section 25.3, « Configuring Network Connections ».
25.7.2. Storing Passwords and Credentials
If you do not want to re-enter your credentials each time you want to connect to an encrypted network, you can use the desktop-specific tools GNOME Keyring Manager or KWalletManager to store your credentials encrypted on the disk, secured by a master password.
In KDE, you can configure if and how to store your credentials. To do so, left-click the NetworkManager icon and select . Click + and select one of the following options:
- Do Not Store (Always Prompt)
This is useful if you are working in an environment where storing credentials is considered a security risk.
- In File (Unencrypted)
If you choose this option, your passwords are stored unencrypted in the respective connection file that is created for each connection.
![[Warning]](static/images/warning.png)
Security Risk Storing your network credentials unencrypted is a security risk. Everybody who has access to your computer can reuse your connectivity and intercept your network connection.
- In Secure Storage (Encrypted)
If you choose this option, your credentials are stored in KWalletManager.
25.8. Frequently Asked Questions
In the following, find some frequently asked questions about configuring special network options with NetworkManager.
- How to tie a connection to a specific device?
By default, connections in NetworkManager are device type-specific: they apply to all physical devices with the same type. If more than one physical device per connection type is available (for example, your machine is equipped with two ethernet cards), you can tie a connection to a certain device.
To do so in GNOME, first look up the MAC address of your device by using the output of the command line tool ifconfig. Then start the dialog for configuring network connections and choose the connection you want to modify. On the or tab, enter the of the device and confirm your changes.
If you are using use KDE, start the dialog for configuring network connections and choose the connection you want to modify. On the or tab, use the option to select the network interface to which to tie the connection.
- How to specify a certain access point in case multiple access points with the same ESSID are detected?
When multiple access points with different wireless bands (a/b/g/n) are available, the access point with the strongest signal is automatically chosen by default. To override this, use the field when configuring wireless connections.
The Basic Service Set Identifier (BSSID) uniquely identifies each Basic Service Set. In an infrastructure Basic Service Set, the BSSID is the MAC address of the wireless access point. In an independent (ad-hoc) Basic Service Set, the BSSID is a locally administered MAC address generated from a 46-bit random number.
Start the dialog for configuring network connections as described in Section 25.3, « Configuring Network Connections ». Choose the wireless connection you want to modify and click . On the tab, enter the BSSID.
- How to share network connections to other computers?
The primary device (the device which is connected to the Internet) does not need any special configuration. However, you need to configure the device that is connected to the local hub or machine as follows:
Start the dialog for configuring network connections as described in Section 25.3, « Configuring Network Connections ». Choose the connection you want to modify and click . If you are using GNOME, switch to the tab and from the drop-down list, choose . If you are using KDE, switch to the or tab and from the drop-down list, choose . That will enable IP traffic forwarding and run a DHCP server on the device. Confirm your changes in NetworkManager.
As the DCHP server uses port 67, make sure that it is not blocked by the firewall: On the machine sharing the connections, start YaST and select +. Switch to the category. If is not already shown as , select from and click . Confirm your changes in YaST.
- How to provide static DNS information with automatic (DHCP, PPP, VPN) addresses?
In case a DHCP server provides invalid DNS information (and/or routes), you can override it. Start the dialog for configuring network connections as described in Section 25.3, « Configuring Network Connections ». Choose the connection you want to modify and click . If you are using GNOME, switch to the tab, and from the drop-down list, choose . If you are using KDE, switch to the or tab, and from the drop-down list, choose . Enter the DNS information in the and fields. From the drop-down list at the top of the tab, select if you want to . Confirm your changes.
- How to make NetworkManager connect to password protected networks before a user logs in?
Define a
system connectionthat can be used for such purposes. For more information, refer to Section 25.7, « NetworkManager and Security ».
25.9. Troubleshooting
Connection problems can occur. Some common problems related to NetworkManager include the front-end not starting or a missing VPN option. Methods for resolving and preventing these problems depend on the tool used.
- NetworkManager Front-End Does Not Start
The GNOME and KDE NetworkManager front-ends start automatically if the network is set up for NetworkManager control. If the front-end does not start, check if NetworkManager is enabled in YaST as described in Section 25.2, « Enabling or Disabling NetworkManager ». Then make sure that the appropriate package for your desktop environment is also installed. If you are using KDE 4, the package is
plasmoid-networkmanagement. For GNOME users the package isNetworkManager-gnome.If the desktop front-end is installed but is not running for some reason, start it manually with Alt+F2 and nm-applet (GNOME) or by clicking the and choosing . (KDE) Double-click the entry and click the again.
- NetworkManager Front-End Does Not Include the VPN Option
Support for NetworkManager, front-ends, and VPN for NetworkManager is distributed in separate packages. If your NetworkManager front-end does not include the VPN option, check if the packages with NetworkManager support for your VPN technology are installed. For more information, see Section 25.6, « NetworkManager and VPN ».
- No Network Connection Available
If you have configured your network connection correctly and all other components for the network connection (router, etc.) are also up and running, it sometimes helps to restart the network interfaces on your computer. To do so, log in to a command line as
rootand run rcnetwork restart.
25.10. For More Information
More information about NetworkManager can be found on the following Web sites and directories:
- NetworkManager Project Page
- KDE NetworkManager Front-End
- Package Documentation
Also check out the information in the following directories for the latest information about NetworkManager and the GNOME and KDE NetworkManager front-ends:
/usr/share/doc/packages/NetworkManager/,/usr/share/doc/packages/NetworkManager-gnome/.