Chapitre 5. Installation et Désinstallation de Logiciels
Table des matières
Utilisez l'outil de gestion de logiciels YaST pour chercher pour les composants logiciel que vous souhaitez ajouter ou enlever. YaST résoud toutes les dépendances pour vous. Pour installer des paquets non livrés avec le média d'installation, ajoutez des dépôts de logiciels supplémentaires pour votre configuration et laissez YaST les gérés. Gardez votre système à jour avec l'application de mise à jour.
Changez la collection de logiciels de votre système avec le module de gestion des logiciels de YaST. Ce module YaST est disponible en trois versions de boîte à outils : Qt(pour les environnements KDE), GTK+ (pour les environnements GNOME), et ncurses (fournissant une interface utilisateur pseudo-graphique en mode texte). Ce chapitre décrit les versions Qt et GTK+ pour des détails sur le ncurses de YaST, voir le Chapitre 12, YaST in Text Mode.
![[Tip]](static/images/tip.png) | Changement de la version de la boîte à outils. |
|---|---|
Par défaut, YaST est démarré avec la boîte à outils correspondant à votre environnement (GTK+ sous GNOME, Qt sous KDE). Pour modifier ces réglages par défaut, changez la variable
If you do not want to change the system-wide settings, you can
nevertheless start YaST in the desired flavor from command line by
using the | |
![[Note]](static/images/note.png) | Confirmation et vérification des modifications. |
|---|---|
Pendant l'installation, la mise à jour ou l'enlèvement d'un paquet, tout changement dans le gestionnaire de logiciel n'est pas appliquée immédiatement mais seulement après les avoir confirmer avec ou respectivement. YaST maintient une liste de toutes les actions, vous permettant de les vérifier et les modifier avant de les appliquer sur votre système. | |
5.1. Définitions
- Dépôt
Un répertoire local ou distant contenant des paquets, et des informations supplémentaires sur ceux-ci (métadonnées)
- Alias (de dépôt)
Le nom court d'un dépôt utilisé par plusieurs commandes zypper. Les alias peuvent être choisis par l'utilisateur au moment de l'ajout d'un dépôt et doit être unique.
- Produit
Représente un produit complet, par exemple openSUSE®.
- Modèle
Un modèle est un groupe de paquets installables dédié à certain usage. Par exemple, le modèle
Laptopcontient tous les paquets nécessaires aux environnements informatiques itinérants. Les modèles définissent des dépendances de paquets (comme des paquets requis ou recommandés) et viennent avec une préselection de sélection de paquets marqués pour l'installation.Ceci assure que les plus importants paquets nécessaires pour un certain usage sont disponibles sur votre système après l'installation du modèle. Cependant, tous les pacquets ne sont pas nécessairement préselectionnés dans un modèle pour l'installation et vous pouvez sélectionner ou désélectionnerles paquets dans un modèle selon vos besoins et vos souhaits.- Paquet
Un paquet est un fichier compréssé au format
rpmqui contient les fichiers pour un programme particulier.- Patch
Un correctif comprend un ou plusieurs paquets et peut être appliqué au moyen de deltarpms. Il peut être aussi introduire des dépendances pourdes paquets qui ne sont pas encore installés.
- Solution
Terme générique pour les produits, modèles, paquets ou correctifs. Les types les plus utilisés de resolvable sont les paquets et les correctifs.
- rpm-delta
Un rpm-delta se compose seulement de la différence entre les deux versions d'un paquet, elle a donc une taille de téléchargement minimale. Avant d'être installée, le paquet RPM entier est reconstruit sur la machine locale.
- Dépendances d'un paquet
Certains paquet sont dépendant d'autres, tel que des librairies dynamiques. En d'autres termes, un paquet peut
nécessiterd'autres paquets—si le paquet requis n'est pas disponible, le paquet ne peut pas être installé. En plus des dépendances (exigées pour le paquet) qui doivent être complètement remplies, quelques paquetsrecommandentd'autres paquets. Ces paquets recommandés ne sont seulement installés que si ils sont réellement disponibles, sinon ils sont juste ignorés et le paquet les recommandant est néanmoins installé.
5.2. Utilisation de l'interface KDE (Qt)
The YaST Qt interface is started by default when using the desktops KDE, icewm, and others. It is also used when invoking YaST from a remote terminal. Start the software manager from the YaST Control Center by choosing +.
 |
5.2.1. Vues pour la recherche de paquets ou de modèles.
Le gestionnaire de logiciels YaST peut installer des paquets ou des modèles depuis tout dépôt courant disponible. Il offre différentes vues et filtres pour faciliter la recherche de logiciels. La vue est la vue par défaut de la fenêtre. Pour changer de vue, cliquez et sélectionnez une des entrées du menu déroulant. La vue sélectionnée s'ouvrira dans un nouvel onglet.
- Modèles
Lists tous les modèles disponibles pour l'installation sur votre système.
- Groupes de paquets
Liste tous les paquets triés par groupes tels que , , or .
- Groupes RPM
Lists all packages sorted by functionality with groups and subgroups. For example ++.
- Langues
Filtre tous les paquets nécessaire pour ajouter une nouvelle langue pour le système.
- Dépôts
Filter to list packages by repository. In order to select more than one repository, hold the Ctrl key while clicking on repository names. The « pseudo repository » lists all packages currently installed.
- Chercher
Lets you search for a package according to certain criteria. Enter a search term and press Entrée. Refine your search by specifying where to and by changing the . For example, if you do not know the package name but only the name of the application that you are searching for, try including the package in the search process.
- Résumé de l'installation
If you have already selected packages for installation, update or removal, this view shows the changes that will be applied to your system as soon as you click . To filter for packages with a certain status in this view, activate or deactivate the respective check boxes. Hit Maj+F1 for details on the status flags.
| Finding Packages not Belonging to an Active Repository |
|---|---|
To list all packages that do not belong to an active repository, choose ++ and then choose +. This is useful, for example, if you have deleted a repository and would like to make sure no packages from that repository remain installed. | |
5.2.2. Installation et retrait de paquets ou de modèles.
Certains paquets sont dépendants d'autres paquets, tel que des bibliothèques partagées. D'un autre côté, quelques paquets ne peuvent co-exister avec d'autres sur un systèmes. Si possible, YaST résoud automatiquement les dépendances et les conflits. Si votre choix produit des conflits de dépendance qui ne peuvent être résolus, vous aurez besoin de les résoudre manuellement de la façon décrite dans la Section 5.2.4, « Vérifier les dépendances logiciellles ».
| Suppression de paquets |
|---|---|
When removing any packages, by default YaST only removes the selected packages. If you want YaST to also remove any other packages that become unneeded after removal of the specified package, select +. | |
Cherchez les paquets de la manières décrites à la Section 5.2.1, « Vues pour la recherche de paquets ou de modèles. ».
The packages found are listed in the right pane. To install a package or remove it, right-click it and choose or . If the relevant option is not available, check the package status indicated by the symbol in front of the package name—hit Maj+F1 for help.
Appliquez une action à tous les paquets listés To apply an action to all packages listed in the right pane, choose an action from +.
pour installer un modèle, clic-droit sur le nom de modèle et choisir .
Il n'est pas possible d'enlever un modèle en soi. A la place, sélectionner les paquets d'un modèle que vous voulez supprimer et marquez les pour la suppression.
Afin de sélectionner plusieurs paquets, répétez les étapes mentionnées ci-dessus.
Before applying your changes, you can review or modify them by clicking +. By default, all packages that will change status, are listed.
Afin de rétabir le statut d'un paquet, faites un clic-droit sur le paquet et sélectionnez une des entrées suivantes : si le paquet a été programmé pour être effacé ou mis à jour, ou si celui-ci a été programmé pour l'installation. Pour abandonner tous les changements et fermer le gestionnaire de logiciels, cliquez et
Quand vous avez fini, cliquez sur pour appliquer vos changements.
Dans le cas où YaST trouve des dépendances sur d'autres paquets, une liste des paquets qui on été choisis en plus pour l'installation, la mise à jour ou la suppression est présentée. Cliquez pour les accepter.
Après que tous les paquets ont été installés, mis à jour ou supprimé, le gestionnaire de logiciels YaST termine automatiquement.
| Installation des paquets sources. |
|---|---|
Intaller des paquets sources avec le gestionnaire de logiciels YaST n'est pas possible pour le moment. Utilises l'outil en ligne de commande zypper pour cela. Pour plus d'informations, voir Section 9.1.2.1, « Installing Source Packages ». | |
5.2.3. Mise à jour de paquets
Au lieu de mettre à jour les paquets individuellement, vous pouvez aussi faire les mises à jour de tous les paquets installés de tous les paquets d'un dépôt particulier. Quand vous faites ce type de mise à jour de masse, les aspects suivants sont généralement pris en compte :
priorities of the repositories that provide the package,
architecture of the package (for example, x86_64, i686, i586),
version number of the package,
package vendor.
Lequel de ces aspects a la plus haute importance pour le choix des paquets candidats à la mise à jour en regard de l'option de mise à jour que vous avez choisi.
To update all installed packages to the latest version, choose ++ from the main menu.
Tous les dépôts sont vérifier pour déterminer s'ils sont candidats pour une mise à jour, en utilisant la politique suivante : YaST premièrement essaie de restreindre la recherche aux paquets de même architecture et du même fournisseur que celui déjà installé. Si la recherche est positive , le « meilleur » candidat à la mise à jour parmi eux est sélectionné selon le processus ci-dessus. Cependant , si aucun paquet comparable du même fournisseur ne peut être trouvé., la recherche est étendue à tous les paquets avec la même architecture. Si encore une fois aucun paquet comparable n'est trouvé, tous les paquets sont pris en compte et le « meilleur » candidat est sélectionné selon les critères suivant :
Priorité au dépôt : Préfère le paquet depuis le dépôt ayant la plus haute priorité.
Si plus d'un paquet resultent de cette sélection, choisissez celle avec le « meilleure » architecture (meileur choix : celui correspondant à l'architecture installée; sinon: x86_64 > i686 > i586).
Si le paquet résultant a un numéro de version que celui installé, le paquet installé sera mis à jour et remplacer par le candidat sélectionné.
Cette option essaie d'éviter le changement d'architecture ou de fournisseur pour les paquet installés, mais en certaines circonstances, ces changements sont tolérés.
Mise à jour inconditionnelle If you choose ++ instead, basically the same criteria apply but any candidate package found is installed unconditionally. Thus, choosing this option might actually lead to downgrading some packages.
Pour vous assurez que les paquets pour une mise à jour de masse proviennent d'un dépôt spécifique:
Choisir le dépôt depuis lequel faire la mise à jour comme décrit à la Section 5.2.1, « Vues pour la recherche de paquets ou de modèles. » .
Sur la droite de la fenêtre, cliquez . Ceci permet explicitement à YaST de changer le fournisseur du paquet au moment du remplacement des paquet.
Dès que vous avez terminé avec , tous les paquets installés seront remplacé par les paquets issuent de ce dépôt, si ils sont disponibles. Cela peut conduire à des changements de l'architecture, du fournisseur et même du déclassement de certains paquets.
Pour s'abstenir de cela, cliquez . Notez que l'annulation aura lieu seulement au moment où vous presssez le bouton .
Before applying your changes, you can review or modify them by clicking +. By default, all packages that will change status, are listed.
Si toutes les options sont mise en conformité à vos souhaits, confirmez vos changements avec pour commencer la mise à jour de masse.
5.2.4. Vérifier les dépendances logiciellles
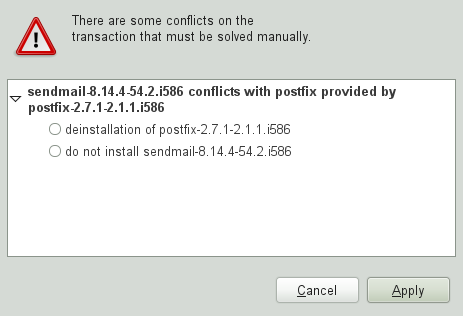
Beaucoup de paquets dépendent d'autres. Si un paquet, par exemple, utilise une librairie partagée, il est dépendant du paquet fournissant cette librairie. D'autre part quelques paquets ne peuvent coexister avec d'autres, ceci causant des conflits (par exemple, vous ne pouvez seulement installé qu'unseul agent de transfert de mail : sendmail ou postfix). Au moment de l'installation ou de la supression des logiciels, le gestionnaire de logiciels assure qu'aucune dépendance ou conflit ne soit irrésolu afin d'assurez l'intégrité du système.
Au cas où il existe seulement une solution pour résoudre une dépendance ou un conflit, il est résolu automatiquement. Des solutions multiples produisent des conflits qui ne peuvent être résolus que manuellement. Si la résolution d'un conflit implique un changement de fournisseur ou un changement d'architecture, elle a besoin d'êtres faite aussi manuellement.Quand vous cliquez sur pour appliquer tous les changements dans le gestionnaire de logiciels, vous obtenez un vue d'ensemble de toutes les actions entreprise par le résolveur automatique qui ont eu besoin d'une confirmation.
By default, dependencies are automatically checked. A check is performed every time you change a package status (for example, by marking a package for installation or removal). This is generally useful, but can become exhausting when manually resolving a dependency conflict. To disable this function, uncheck +. Manually perform a dependency check with +. A consistency check is always performed when you confirm your selection with .
Pour revoir une dépendance de paquets, faites un clic droit dessus et choisir . Une carte montrant les dépendances s'ouvre. Les paquets qui ont été déjà intallés sont affichés dans une fenêtre verte.
| Résolution manuelle des conflits |
|---|---|
Si vous n'êtes pas très expérimenté, suivez les recommandations de YaST produitent lors de la manipulation de paquets conflictuels, car vous ne pouriez pas pouvoir les résoudre. Gardez à l'esprit que tous les changements que vous faites peuvent potentiellement déclencher d'autres conflits, ainsi vous pouvez facilement vous retrouver avec un nombre sans cesse croissant de conflits. Au cas où cela vous arrive, Le gestionnaire de logiciel, tous vos changements et recommencez. | |

5.3. Using the GNOME Interface (GTK+)
The YaST GTK+ interface is started by default when using the desktops GNOME and XFCE. Start the software manager from the YaST Control Center by clicking +.
 |
5.3.1. Views for Searching Packages or Patterns
The easiest way to find a package is to use the search field in the upper right corner of the software manager. Enter a search term and press Entrée. By default it will search package names and summaries. Press the search item to change this filter and search the file lists, for example.
The software manager also offers different views and filters for displaying package lists. These are available from the pull-down menu in the upper left corner:
- Groups
The default view lists all packages sorted by groups such as , , , or .
- RPM Groups
Lists all packages sorted by functionality with groups and subgroups. For example ++.
- Repositories
Filter to list packages by repository. In order to select more than one repository, hold the Ctrl key while clicking on repository names. The « pseudo repository » lists all packages currently installed.
To add, edit, or remove available repositories, click .
- Patterns
Lists all patterns available for installation on your system.
- Languages
Filter to list all packages needed to add a new system language.
The box in the lower right corner of the dialog also allows to filter for packages that are , or . If you select the entry, all available packages from the configured repositories are displayed, independent of their status.
5.3.2. Installing and Removing Packages or Patterns
Certain packages are dependent on other packages, such as shared libraries. On the other hand, some packages cannot coexist with others on the system. If possible, YaST automatically resolves these dependencies or conflicts. If your choice results in a dependency conflict that cannot be automatically solved, you need to solve it manually as described in Section 5.2.4, « Vérifier les dépendances logiciellles ».
Search for packages as described in Section 5.3.1, « Views for Searching Packages or Patterns ».
The packages found are listed in the right pane. To further filter the search results according to package status (, , , , select one of the entries in the box at the lower left corner of the dialog. For details about a package, click the package in the list. Information like available versions, authors and changelog of the package are displayed in the lower right corner of the window.
To mark a package for installation, re-installation, removal, or upgrade, right-click the package and choose the appropriate action from the menu.
Applying an Action to All Packages Listed To apply an action to all packages listed in the right pane, right-click a package, choose , right-click again and choose an action.
To install a pattern, right-click the pattern name and choose .
It is not possible to remove a pattern per se. Instead, select the packages of a pattern you want to remove and mark them for removal.
In order to select more packages, repeat the steps mentioned above.
Before applying your changes, you can review or modify them by clicking at the bottom of the dialog. By default, all packages that will change status are listed.
To revert changes for a package, click the icon with the yellow arrow. To finish the review, click .
When you are finished with the selection of packages to install or remove, your changes.
In case YaST found dependencies on other packages, a list of packages that have additionally been chosen for installation, update or removal is presented. Click to accept them.
After all selected packages are installed, updated or removed, the YaST Software Manager automatically terminates.
| Installing Source Packages |
|---|---|
Installing source packages with YaST Software Manager is not possible at the moment. Use the command line tool zypper for this purpose. For more information, see Section 9.1.2.1, « Installing Source Packages ». | |
5.3.3. Updating Packages
Instead of updating individual packages, you can also update all installed packages or all packages from a certain repository. When mass updating packages, the following aspects are generally considered:
priorities of the repositories that provide the package,
architecture of the package (for example, x86_64, i686, i586),
version number of the package,
package vendor.
Which of the aspects has the highest importance for choosing the update candidates depends on the respective update option you choose.
To view the list of packages that can be updated (packages with higher versions are available), select in the bottom left box.
To update all packages listed there, click .
To install only upgradable packages for which an official patch has been issued, click . Those packages are marked by a patch tag next to their version number. Choosing this option is equivalent to doing an online update with YaST as described in Chapitre 6, YaST Online Update.
If no patches have been issued since last applying patches, the button is disabled.
To make sure that the packages for a mass update derive from a certain repository:
Choose the repository from which to update as described in Section 5.3.1, « Views for Searching Packages or Patterns » .
On the right hand side of the window, click . This explicitly allows YaST to change the package vendor when replacing the packages.
All installed packages will be replaced by packages deriving from this repository, if available. This may lead to changes in vendor and architecture and even to downgrading some packages.
Before applying the changes, you can review or modify them by clicking at the bottom of the dialog. By default, all packages that will change status are listed.
To refrain from switching the system packages to the versions in this repository, click the button next to the respective option.
If all options are set according to your wishes, confirm your changes with to start the mass update.
5.3.4. Checking Software Dependencies
Most packages are dependent on other packages. If a package, for example, uses a shared library, it will be dependent on the package providing this library. On the other hand, some packages cannot coexist with each other, causing a conflict (for example, you can only install one mail transfer agent: sendmail or postfix). When installing or removing software, the Software Manager makes sure no dependencies or conflicts remain unresolved to ensure system integrity.
In case there exists only one solution to resolve a dependency or a conflict, it is resolved automatically. Multiple solutions always cause a conflict which needs to be resolved manually. If solving a conflict involves a vendor or architecture change, it also needs to be solved manually. When clicking to apply any changes in the Software Manager, you get an overview of all actions triggered by the automatic resolver which you need to confirm.
By default, dependencies are automatically checked. A check is performed every time you change a package status (for example, by marking a package for installation or removal). This is generally useful, but can become exhausting when manually resolving a dependency conflict. To disable this function, uncheck +. Manually perform a dependency check with +. A consistency check is always performed when you confirm your selection with .
| Manually Solving Package Conflicts |
|---|---|
Unless you are very experienced, follow the suggestions YaST makes when handling package conflicts, otherwise you may not be able to resolve them. Keep in mind that every change you make, potentially triggers other conflicts, so you can easily end up with a steadily increasing number of conflicts. In case this happens, click and the software manager. Relaunch it to start again. | |
5.4. Managing Software Repositories and Services
If you want to install third-party software, add additional software repositories to your system. By default, the product repositories such as openSUSE-DVD 12.3 and a matching update repository are automatically configured during the installation. Depending on the initially selected product, a separate language add-on repository with translations, dictionaries, etc. might also be configured.
To manage repositories, start YaST and select +. The dialog opens. Here, you can also manage subscriptions to so-called by changing the at the right corner of the dialog to . A Service in this context is a (RIS) that can offer one or more software repositories. Such a Service can be changed dynamically by its administrator or vendor.
Each repository provides files describing content of the repository (package names, versions, etc.). These repository description files are downloaded to a local cache that is used by YaST. To ensure their integrity, software repositories can be signed with the GPG Key of the repository maintainer. Whenever you add a new repository, YaST offers the ability to import its key.
![[Warning]](static/images/warning.png) | Trusting External Software Sources |
|---|---|
Before adding external software repositories to your list of repositories, make sure this repository can be trusted. openSUSE is not responsible for any potential problems arising from software installed from third-party software repositories. | |
5.4.1. Adding Software Repositories
You can either add repositories from a local harddisk, from a removable medium (like a CD, DVD or a USB mass storage) or from a network.
To add repositories from the dialog in YaST proceed as follows:
Click .
From the list of available specify the type matching your repository:
For network sources, it is usually sufficient to use the default option, .
To add a repository from a removable medium or a local harddisk, choose the relevant option and insert the medium or connect the USB device to the machine, respectively.
You can choose to now. If the option is unchecked, YaST will automatically download the files later, if needed. Click to proceed.
When adding a repository from the network, enter the data you are prompted for. Continue with .
Depending on the repository you have added, you might be asked if you want to import the GPG key with which it is signed or asked to agree to a license.
After confirming these messages, YaST will download and parse the metadata and add the repository to the list of .
If needed, adjust the repository as described in Section 5.4.2, « Managing Repository Properties » or confirm your changes with to close the configuration dialog.
Now you can install software from this repository as described in Section 5.2, « Utilisation de l'interface KDE (Qt) » or in Section 5.3, « Using the GNOME Interface (GTK+) ».
YaST also offers a list of predefined popular repositories available under . Among others, it includes driver repositories for nVidia and ATI graphics cards, and popular projects from the openSUSE® Build Service, such as the Mozilla repository (containing packages with the most recent versions of Firefox and Thunderbird).
Procédure 5.1. Configuring Community Repositories
Start YaST and select +.
Click .
Choose and proceed with .
From the preconfigured list of repositories choose the ones you want to add by ticking the respective check boxes. The Mozilla repository, for example, is listed as .
Confirm with .
Accept to the GPG key. You need to import a key for each repository you have chosen.
The new software repositories are now listed in the overview. Click to leave the software repositories configuration.
5.4.2. Managing Repository Properties
The overview of the lets you change the following repository properties:
- Status
The repository status can either be or . You can only install packages from repositories that are enabled. To turn a repository off temporarily click . You can also double-click on a repository name to toggle its status. If you want to remove a repository completely, click .
- Refresh
When refreshing a repository, its content description (package names, versions, etc.) is downloaded to a local cache that is used by YaST. It is sufficient to do this once for static repositories such as CDs or DVDs, whereas repositories whose content changes often should be refreshed frequently. The easiest way to keep a repository's cache up-to-date is to choose . To do a manual refresh click and select one of the options.
Packages from remote repositories are downloaded before being installed. By default, they are deleted upon a successful installation. Activating prevents the deletion of downloaded packages. The download location is configured in
/etc/zypp/zypp.conf, by default it is/var/cache/zypp/packages.The of a repository is a value between
1and200, with1being the highest priority and200the lowest priority. Any new repositories that are added with YaST get a priority of99by default. If you do not care about a priority value for a certain repository, you can also set the value to0to apply the default priority to that repository (99). If a package is available in more than one repository, then the repository with the highest priority takes precedence. This is useful if you want to avoid downloading packages unnecessarily from the Internet by giving a local repository (for example, a DVD) a higher priority.![[Important]](static/images/important.png)
Priority vs. Version The repository with the highest priority takes precedence in any case. Therefore, make sure that the update repository always has the highest priority (20 by default), otherwise you might install an outdated version that will not be updated until the next online update.
If you add repositories providing new versions for programs shipped with openSUSE (for example a repository with the latest KDE or GNOME version), make sure they have a higher priority than the standard repositories, otherwise packages from these repositories will not be installed by default.
- Name and URL
To change a repository name or its URL, select it from the list with a single-click and then click .
5.4.3. Managing Repository Keys
To ensure their integrity, software repositories can be signed with the GPG Key of the repository maintainer. Whenever you add a new repository, YaST offers to import its key. Verify it as you would do with any other GPG key and make sure it does not change. If you detect a key change, something might be wrong with the repository. Disable the repository as an installation source until you know the cause of the key change.
To manage all imported keys, click in the dialog. Select an entry with the mouse to show the key properties at the bottom of the window. , or keys with a click on the respective buttons.
5.5. Keeping the System Up-to-date
openSUSE offers a continuous stream of software security patches for your product. The update applet informs you about the availability of patches and lets you easily install them with just a few clicks.
5.5.1. Using the KDE Software Updater
The Software Updater icon resides in the system tray of your panel depicting a gearwheel with a green arrow. To start Software Updater manually, choose ++ from the main menu. Alternatively, press Alt+F2 and enter kpk_update.
| Icon Visibility |
|---|---|
The Software Updater icon is only visible in the system tray, if patches are available. Hover over the icon to see the number of patches available. | |
5.5.1.1. Installing Patches
Whenever software updates are available, the applet icon appears in the panel. Left-click the Software Updater icon to launch the software window.
Select a patch for installation by ticking its checkbox. Get detailed information on a patch by clicking on its title. To select all available patches for installation, tick the checkbox in the table header.
Click to start the patch installation.
In case you have started the patch installation for the first time, you will be asked to enter the
rootpassword twice in order to proceed. If you also check you will never be asked again to provide the password.The window showing an installation summary opens. Click to finish the installation.

The YaST Online Update offers advanced features to customize the patch installation. Please refer to Chapitre 6, YaST Online Update for more information.
5.5.1.2. Configuring the KDE Software Updater
By default Software Updater checks for updates every 24 hours, notifies you when patches are available and does not automatically install patches. These settings can be changed with the . To open the choose ++ from the main menu. Alternatively, press Alt+F2 and enter kpk_settings. The settings for Software Updater are available in the section.
| Patch Origin |
|---|---|
The also allows you to configure the repositories () to be used. This setting not only applies to Software Updater but also to the KDE Software Management module (). Make sure the repository Updates for openSUSE 12.3 is always selected—otherwise you will not receive patches. | |
5.5.2. Using the GNOME Update Applet
The update applet resides in the notification area of the panel. Its icon changes depending on the availability and relevance of patches and the status of the update. To invoke the applet manually, choose +++.
| Icon visibility |
|---|---|
The applet icon is only visible if the following conditions are met:
To start the update viewer even if no applet icon is visible, press Alt+F2 and enter gpk-update-viewer. | |
- Open box with a globe
The update applet is busy (for example checking for updates or installing software).
- Red Star with Exclamation Mark
Security patches are available.
- Orange Star with an Up Arrow
Important patches are available.
- Yellow Star with a Down Arrow
Trivial patches are available.
- Yellow Triangle with Exclamation Mark
An error has occurred.
5.5.2.1. Installing Patches
Procédure 5.2. Installing Patches
Whenever new patches are available, a notification message will appear and the Update Applet icon will be visible in the notification area.
Either click in the notification message or click the icon to open the window.
All security and important patches are preselected. It is strongly recommended to install these patches. Trivial patches can be manually selected by ticking the respective check boxes. Get detailed information on a patch by clicking on its title.
Click to start the patch installation.
The window showing an installation summary opens. Click to proceed.
Enter the
rootpassword in the authentication screen and proceed with .

The YaST Online Update offers advanced features to customize the patch installation. Please refer to Chapitre 6, YaST Online Update for more information.
5.5.2.2. Configuring the Software Update Applet
To configure the update applet, right-click the update icon in the panel and choose . The configuration dialog lets you modify the following settings:
Choose how often a check for updates is performed: , , , or .
Configure whether patches are installed automatically or not (default). Automatic installation can be chosen for either security patches only or for all patches.
Choose how often a check for major upgrades is performed: , , or .
- Check for updates when using mobile broadband
This configuration option is only available on mobile computers. Turned off by default.
More options are configurable using gconf-editor: +.