Chapitre 10. The Boot Loader GRUB2
Table des matières
This chapter describes how to configure GRUB2 (Grand Unified Bootloader), the boot loader used in openSUSE®. It is a successor of the traditional GRUB boot loader — now called « GRUB Legacy » — which is described in Chapitre 9, The Boot Loader GRUB. GRUB2 has become the default boot loader in openSUSE® since version 12.2. A special YaST module is available for configuring major GRUB2 settings. If you are not familiar with the subject of booting in Linux, read the initial sections of Chapitre 9, The Boot Loader GRUB to acquire some background information. The boot procedure as a whole is outlined in Chapitre 7, Booting a Linux System.
10.1. Main Differences from GRUB Legacy
The configuration is stored in different files. The configuration syntax has changed.
Partition numbers start at 1 (instead of 0 as in GRUB Legacy).
More file-systems are supported.
GRUB2 can directly read files stored on LVM or RAID devices.
The user interface can be translated, including menu entry names.
GRUB2 includes mechanism for loading modules to support specific features, such as filesystems etc.
So called « Stages » were dropped and the images that make up GRUB2 were re-organized.
10.2. Configuration File Structure
The actual configuration of GRUB2 is based on the following files:
/boot/grub2/grub.cfgThis file contains all information about the GRUB2 menu items. It replaces
menu.lstused in GRUB Legacy.grub.cfgis built by the grub2-mkconfig command, and normally is not edited manually./etc/default/grubThis file controls the user settings of GRUB2 and usually includes additional environmental settings such as backgrounds and themes.
- Scripts under
/etc/grub.d/ The scripts in this directory are read during execution of the grub2-mkconfig command. Their instructions are then incorporated into the main configuration file
/boot/grub/grub.cfg./etc/sysconfig/bootloaderThis file is read by the perl-bootloader library which is used when configuring the bootloader with YaST and every time a new kernel is installed. It contains configuration options (such as kernel parameters) that will be added by default to the bootloader configuration file.
GRUB2 can be controlled in various ways. Boot entries from an existing
configuration can be selected from the graphical menu (splash screen).
The configuration is loaded from the file grub.cfg
which is compiled from other configuration files (see below). All GRUB2
configuration files are considered system files, and you need root
privileges to edit them. Remember to run grub2-mkconfig -o
/boot/grub2/grub.cfg after any change to GRUB2 configuration
files.
10.2.1. The File /boot/grub2/grub.cfg
The graphical splash screen with the boot menu is based on the GRUB2
configuration file /boot/grub2/grub.cfg, which
contains all information about all partitions or operating systems that
can be booted by the menu.
Every time the system is booted, GRUB2 loads the menu file from the
file system. For this reason, GRUB2 does not need to be re-installed
after every change to the file. grub.cfg is
automatically rebuilt with kernel installations or removals.
grub.cfg is compiled from the file
/etc/default/grub and scripts found in the
/etc/grub.d/ directory with the
grub2-mkconfig -o /boot/grub2/grub.cfg command.
Therefore you should never edit the file manually. Instead, edit the
related source files under /etc/grub.d/ or use the
YaST boot loader to modify the GRUB2 configuration as described in
Section 10.3, « Configuring the Boot Loader with YaST ».
10.2.2. The File /etc/default/grub
More general options of GRUB2 belong here, such as the time the menu is displayed, or the default OS to boot. To list all available options, see the output of the following command:
grep "export GRUB_DEFAULT" -A50 /usr/sbin/grub2-mkconfig | grep GRUB_
In addition to already defined variables, the user may introduce their
own variables, and use them later in the scripts found in the
/etc/grub.d directory.
After you edit /etc/default/grub, run
grub2-mkconfig -o /boot/grub2/grub.cfg to update the
main configuration file.
10.2.2.1. General Options
This section details some of the options commonly used in the
/etc/default/grub file. For their complete list,
see
GNU
GRUB manual.
- GRUB_DEFAULT
Sets the default menu entry that will be booted next time the computer is rebooted. It can be a numeric value, a complete menu entry quotation, or « saved ». A few examples follow:
GRUB_DEFAULT=2boots the third (counted from zero) boot menu entry.GRUB_DEFAULT="2>0"boots the first submenu entry of the third top level menu entry.GRUB_DEFAULT="Example boot menu entry"boots the menu entry whose title matches the quotation.GRUB_DEFAULT=savedboots the entry specified by the grub2-reboot or grub2-set-default commands. While grub2-reboot sets the default boot entry for the next reboot only, grub2-set-default sets the default boot entry until changed.- GRUB_SAVEDEFAULT
If set to
true, it will automatically choose the last selected OS from the boot menu as the default boot entry on the next boot. For this to work, you also need to specifyGRUB_DEFAULT=saved.- GRUB_HIDDEN_TIMEOUT
Waits the specified number of seconds for the user to press a key. During the period no menu is shown unless the user presses a key. If no key is pressed during the time specified, the control is passed to
GRUB_TIMEOUT.GRUB_HIDDEN_TIMEOUT=0first checks whether Maj is pressed and shows the boot menu if yes, otherwise immediately boots the default menu entry. This is the default when only one bootable OS is identified by GRUB2.- GRUB_HIDDEN_TIMEOUT_QUIET
If
falseis specified, a countdown timer is displayed on a blank screen when theGRUB_HIDDEN_TIMEOUTfeature is active.- GRUB_TIMEOUT
Time period in seconds the boot menu is displayed before automatically booting the default boot entry. If you press a key, the timeout is cancelled and GRUB2 waits for you to make the selection manually.
GRUB_TIMEOUT=-1will cause the menu to be displayed until you select the boot entry manually.- GRUB_CMDLINE_LINUX
Entries on this line are added to the end of the booting command line for both normal and recovery modes. It is used to pass options to the kernel.
- GRUB_CMDLINE_LINUX_DEFAULT
Same as
GRUB_CMDLINE_LINUXbut the entries are passed and appended in the normal mode only.- GRUB_TERMINAL
Enables and specifies input/output terminal device. Can be
console(PC BIOS and EFI consoles),serial(serial terminal),ofconsole(Open Firmware console), or the defaultgfxterm(graphics-mode output).- GRUB_GFXMODE
The resolution used for the
gfxtermgraphical terminal. Note that you can only use modes supported by your graphics card (VBE). The default is ‘auto’, which tries to select a preferred resolution. You can display the screen resolutions available to GRUB2 by typing vbeinfo in the GRUB2 command line. The command line is accessed by typing c when the GRUB2 boot menu screen is displayed.You can also specify a color bit depth by appending it to the resolution setting, for example
GRUB_GFXMODE=1280x1024x24.![[Tip]](static/images/tip.png)
Setting the same resolution in GRUB2 and the operating system will slightly reduce the boot time.
- GRUB_BACKGROUND
Set a background image for the
gfxtermgraphical terminal. The image must be a file readable by GRUB2 at boot time, and it must end with the.png,.tga,.jpg, or.jpegsuffix. If necessary, the image will be scaled to fit the screen.
10.2.3. Scripts in /etc/grub.d
The scripts in this directory are read during execution of the
grub2-mkconfig command, and their instructions are
incorporated into /boot/grub2/grub.cfg. The order
of menu items in grub.cfg is determined by the
order in which the files in this directory are run. Files with a leading
numeral are executed first, beginning with the lowest number.
00_header is run before
10_linux, which would run before
40_custom. If files with alphabetic names are
present, they are executed after the numerically-named files. Only
executable files generate output to grub.cfg during
execution of grub2-mkconfig. By default all files in
the /etc/grub.d directory are executable.
A list of default scripts follows.
00_headerSets environmental variables such as system file locations, video settings, themes, and previously saved entries. It also imports preferences stored in the
/etc/default/grub. Normally you do not need to make changes to this file.10_linuxIdentifies Linux kernels on the root device and creates relevant menu entries. This includes the associated recovery mode option if enabled. Only the latest kernel is displayed on the main menu page, with additional kernels included in a submenu.
30_os-proberThis script uses OS-prober to search for Linux and other operating systems and places the results in the GRUB2 menu. There are sections to identify specific operating systems, such as Linux, Windows, Hurd, or Mac OS X.
40_customA template for custom menu entries to be inserted into
grub.cfg. The contents of this file, below theexec tail -n +3 $0line and the default comments, are imported directly intogrub.cfgwithout any changes.90_persistentThis is a special script which copies a corresponding part of the
grub.cfgfile and outputs it back unchanged. This way you can modify that part ofgrub.cfgdirectly and the change survives the execution of grub2-mkconfig.
10.2.4. The File /etc/sysconfig/bootloader
This configuration file is only used when configuring the bootloader
with YaST and every time a new kernel is installed. It is evaluated by
the perl-bootloader library which modifies the bootloader configuration
file (for example /boot/grub2/grub.cfg for GRUB2)
accordingly. /etc/sysconfig/bootloader is not a
GRUB2 specific configuration file - the values are applied to any
bootloader installed on openSUSE.
![[Note]](static/images/note.png) | Bootloader Configuration after a Kernel Update |
|---|---|
Every time a new kernel is installed, the perl bootloader writes a new
bootloader configuration file using the defaults specified in
| |
LOADER_TYPESpecifies the bootloader installed on the system (e.g. GRUB2, GRUB, or LILO). Do not modify—use YaST to change the bootloader as described in Section 10.3.5, « Changing Boot Loader Type ».
LOADER_LOCATIONSpecifies the location of the bootloader. Do not modify—use YaST to change the bootloader as described in Section 10.3.2, « Modifying the Boot Loader Location ».
DEFAULT_VGA / FAILSAFE_VGA / XEN_VGAScreen resolution and color depth of the framebuffer used during booting are configured with the kernel parameter
vga. These values define which resolution and color depth to use for the default boot entry, the failsafe and the XEN entry. The following values are valid:Tableau 10.1. Screen Resolution and Color Depth Reference
640x480
800x600
1024x768
1280x1024
1600x1200
8bit
0x301
0x303
0x305
0x307
0x31C
15bit
0x310
0x313
0x316
0x319
0x31D
16bit
0x311
0x314
0x317
0x31A
0x31E
24bit
0x312
0x315
0x318
0x31B
0x31F
DEFAULT_APPEND / FAILSAFE_APPEND / XEN_KERNEL_APPENDKernel parameters (other than
vga) that are automatically appended to the default, failsafe and XEN boot entries in the bootloader configuration file.CYCLE_DETECTION / CYCLE_NEXT_ENTRYConfigure whether to use boot cycle detection and if so, which alternative boot entry from to boot in case of a reboot cycle (e.g.
Failsafe). See/usr/share/doc/packages/bootcycle/READMEfor detailed information.
10.2.5. Mapping between BIOS drives and Linux devices
In GRUB Legacy, the device.map configuration file
was used to derive Linux device names from BIOS drive numbers. The map
between BIOS drives and Linux devices cannot always be guessed
correctly: for example, GRUB will get the order wrong if you exchange
the boot sequence between IDE and SCSI in your BIOS.
GRUB2 avoids this problem by using device ID strings (UUIDs) or file
system labels when generating grub.cfg. GRUB2
utilities create a temporary device map on the fly, which is usually
sufficient, particularly in the case of single-disk systems.
However, if you need to override the GRUB2's automatic device mapping
mechanism, create your custom mapping file
/boot/grub2/device.map similarly as in GRUB
Legacy (see Section 9.1.2, « The File device.map » for more details). Please
note that GRUB2 partition number start at 1 and not at 0 as in GRUB
Legacy.
10.2.6. Editing Menu Entries during the Boot Procedure
Editing menu entries facilitates the repair of a defective system that can no longer be booted, because the faulty configuration file of the boot loader can be circumvented by manually entering parameters. Manually entering parameters during the boot procedure is also useful for testing new settings without impairing the native system.
In the graphical boot menu, select the operating system to boot with the arrow keys. If you select a Linux system, you can enter additional boot parameters at the boot prompt. To edit individual menu entries directly, press Esc to exit the splash screen and get to the GRUB2 text-based menu then press E. Changes made in this way only apply to the current boot and are not adopted permanently.
| Password-protected Bootloader |
|---|---|
If you protected you bootloader with a password as described in Section 10.2.7, « Setting a Boot Password », you need to first enter the specified username and password to « unlock » the bootloader. | |
![[Important]](static/images/important.png) | Keyboard Layout during the Boot Procedure |
|---|---|
The US keyboard layout is the only one available when booting. See Figure « US Keyboard Layout » (↑Start-Up). | |
Configuration options and commands related to the selected boot entry appears in a simple text editor interface. Use arrows to move in the text and modify the menu entry as desired. The TAB key suggests possible completions, while ESC discards all changes and returns to the GRUB2 menu. Once you finish editing the menu-entry, press F10 to boot it.
10.2.7. Setting a Boot Password
Even before the operating system is booted, GRUB2 enables access to file systems. Users without root permissions can access files in your Linux system to which they have no access once the system is booted. To block this kind of access or to prevent users from booting certain operating systems, set a boot password.
| Boot Password and Splash Screen |
|---|---|
If you use a boot password for GRUB2, the usual splash screen is not displayed. | |
As the user root, proceed as follows to set a boot
password:
At the root prompt, encrypt the password using grub2-mkpasswd-pbkdf2:
# grub2-mkpasswd-pbkdf2
Password: ****
Reenter password: ****
PBKDF2 hash of your password is grub.pbkdf2.sha512.10000.9CA4611006FE96BC77A...
Paste the encrypted long string into the file
/etc/grub.d/40_customtogether with the set superusers command. Remember to keep the commented lines at the beginning:set superusers="root" password_pbkdf2 root grub.pbkdf2.sha512.10000.9CA4611006FE96BC77A...
Run grub2-mkconfig -o /boot/grub2/grub.cfg to import the changes into the main configuration file.
After you reboot, you will be prompted for username and password when trying to boot any menu entry. Enter
rootand the password you typed during the grub2-mkpasswd-pbkdf2 command. If the credentials are correct, the system will boot the selected boot entry.
10.3. Configuring the Boot Loader with YaST
The easiest way to configure general options of the boot loader in your openSUSE system is to use the YaST module. In the YaST Control Center, select +. As in Figure 9.1, « Boot Loader Settings », this shows the current boot loader configuration of your system and allows you to make changes.

Use the tab to view and change settings related to type, location and advanced loader settings. To use the GRUB2 boot loader, make sure it is selected from the list of available boot loaders.
10.3.1. Adjusting the Default Boot Entry
To change the system that is booted by default, proceed as follows:
Procédure 10.1. Setting the Default System
Click and open the list.
Select the desired entry from the list. Note that the « > » sign in the boot entry name delimits boot section and its subsection.
Click to activate these changes.
10.3.2. Modifying the Boot Loader Location
To modify the location of the boot loader, follow these steps:
Procédure 10.2. Changing the Boot Loader Location
Select the tab and then choose one of the following options for :
This installs the boot loader in the MBR of the first disk (according to the boot sequence preset in the BIOS).
This installs the boot loader in the boot sector of the
/partition (this is the default).This installs the boot loader in the boot sector of the
/bootpartition.This installs the boot loader in the extended partition container.
Use this option to specify the location of the boot loader manually.
Click to apply your changes.
10.3.3. Changing the Boot Loader Time-Out
The boot loader does not boot the default system immediately. During the time-out, you can select the system to boot or write some kernel parameters. To set the boot loader time-out, proceed as follows:
Procédure 10.3. Changing the Boot Loader Time-Out
Open the tab.
Click .
Change the value of by typing in a new value and clicking the appropriate arrow key with your mouse, or by using the arrow keys on the keyboard.
Click twice to save the changes.
![[Warning]](static/images/warning.png) | Timeout of 0 Seconds |
|---|---|
When setting the timeout to 0 seconds, you will not be able to access GRUB2 during boot time. When having set the default boot option to a non-Linux operation system at the same time, this effectively disables access to the Linux system. | |
10.3.4. Configuring Advanced Options
Advanced boot options can be configured via +. Normally, it should not be necessary to change the default settings.
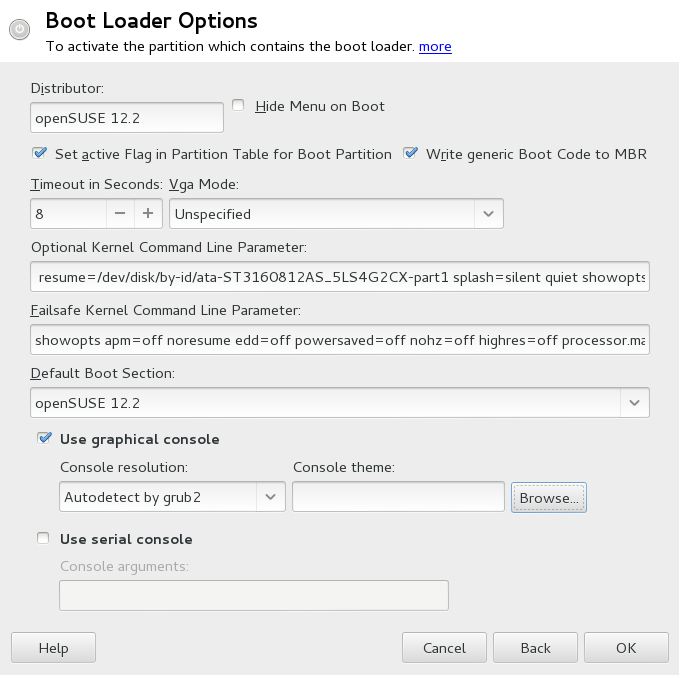
Activates the partition that contains the boot loader. Some legacy operating systems (such as Windows 98) can only boot from an active partition.
Replaces the current MBR with generic, operating system independent code.
Hides the boot menu and boots the default entry.
When checked, the boot menu appears on a graphical splash screen rather than in a text mode. The resolution of the boot screen can be then set from the list, and also graphical theme definition file can be specified with the file-chooser.
If your machine is controlled via a serial console, activate this option and specify which COM port to use at which speed. See info grub or http://www.gnu.org/software/grub/manual/grub.html#Serial-terminal
10.3.5. Changing Boot Loader Type
Set the boot loader type in . The default boot loader in openSUSE is GRUB2. To use GRUB, LILO or ELILO, proceed as follows:
| LILO is unsupported |
|---|---|
Using LILO is not recommended—it is unsupported on openSUSE. Only use it in special cases. | |
Procédure 10.4. Changing the Boot Loader Type
Select the tab.
For , select or .
In the dialog box that opens, select one of the following actions:
Have YaST propose a new configuration.
Have YaST convert the current configuration. When converting the configuration, some settings may be lost.
Write a custom configuration. This action is not available during the installation of openSUSE.
Load your own bootloader configuration file. This action is not available during the installation of openSUSE.
Click two times to save the changes.
During the conversion, the old GRUB2 configuration is saved to the disk. To use it, simply change the boot loader type back to GRUB2 and choose . This action is available only on an installed system.
| Custom Boot Loader |
|---|---|
To use a boot loader other than GRUB2, GRUB, or LILO, select . Read the documentation of your boot loader carefully before choosing this option. | |
10.4. For More Information
Extensive information about GRUB2 is available at http://www.gnu.org/software/grub/. Also refer to the grub info page. You can also search for the keyword « GRUB2 » in the Support Database at http://en.opensuse.org/Portal:Support_database to get information about special issues.